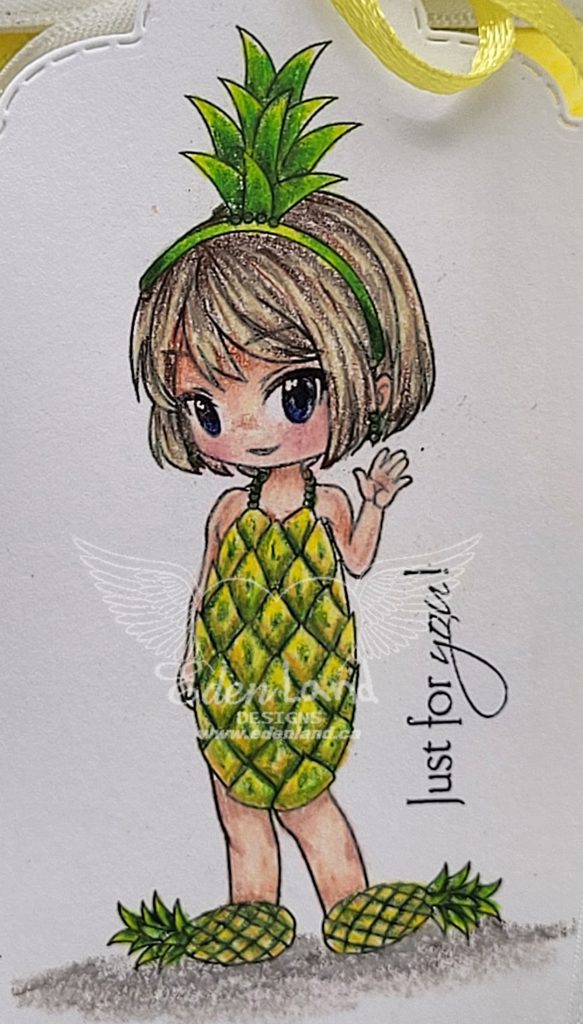
Hi there 🙂 I’m thrilled to be guest designing for Coloring With Pencils Challenge today. I was given an image from one of the fabulous sponsors, Leann’s World 101, to work with. I colored Penny up with my Prismacolor pencils, then cut it out with a tag die. I added the sentiment before printing the image.
To showcase the tag, I decided to make a gift bag/box to go with it. I cut the bottom part out of yellow card stock, then added the pineapple skin print with my pencils. I added the green leafy part to the top, then used some white and yellow ribbon to close the package up, and attach the tag. I’m loving the final result, and think it’s a fun presentation for a gift for someone special! I hope you can find some time to pick up your pencils, and join us for this month’s challenge!!
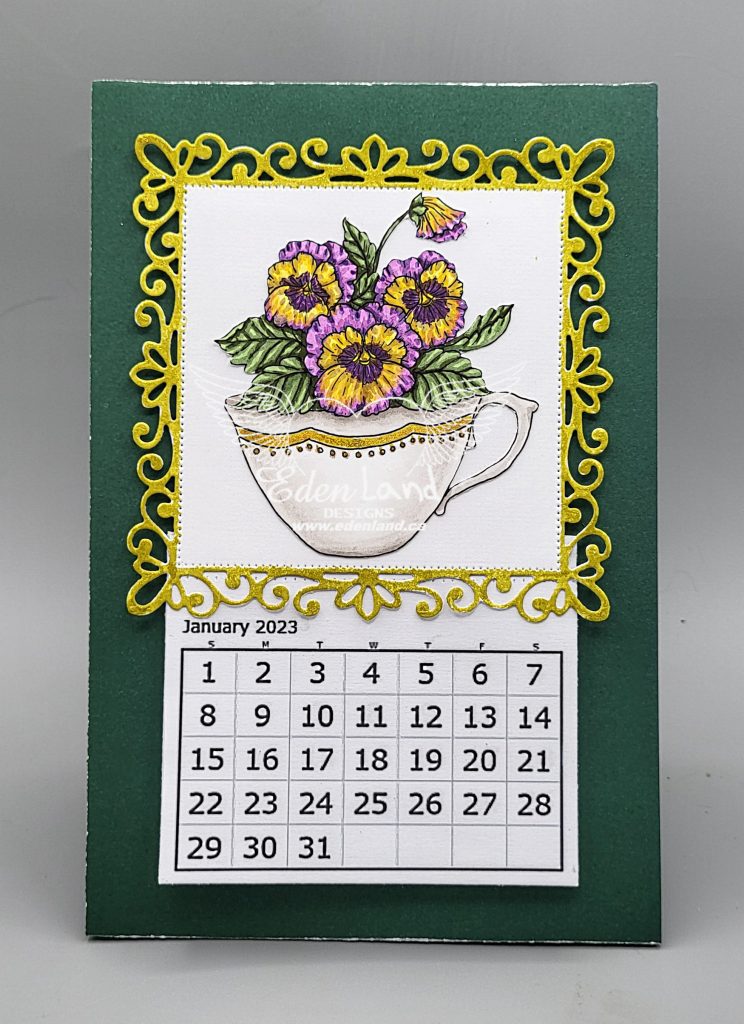
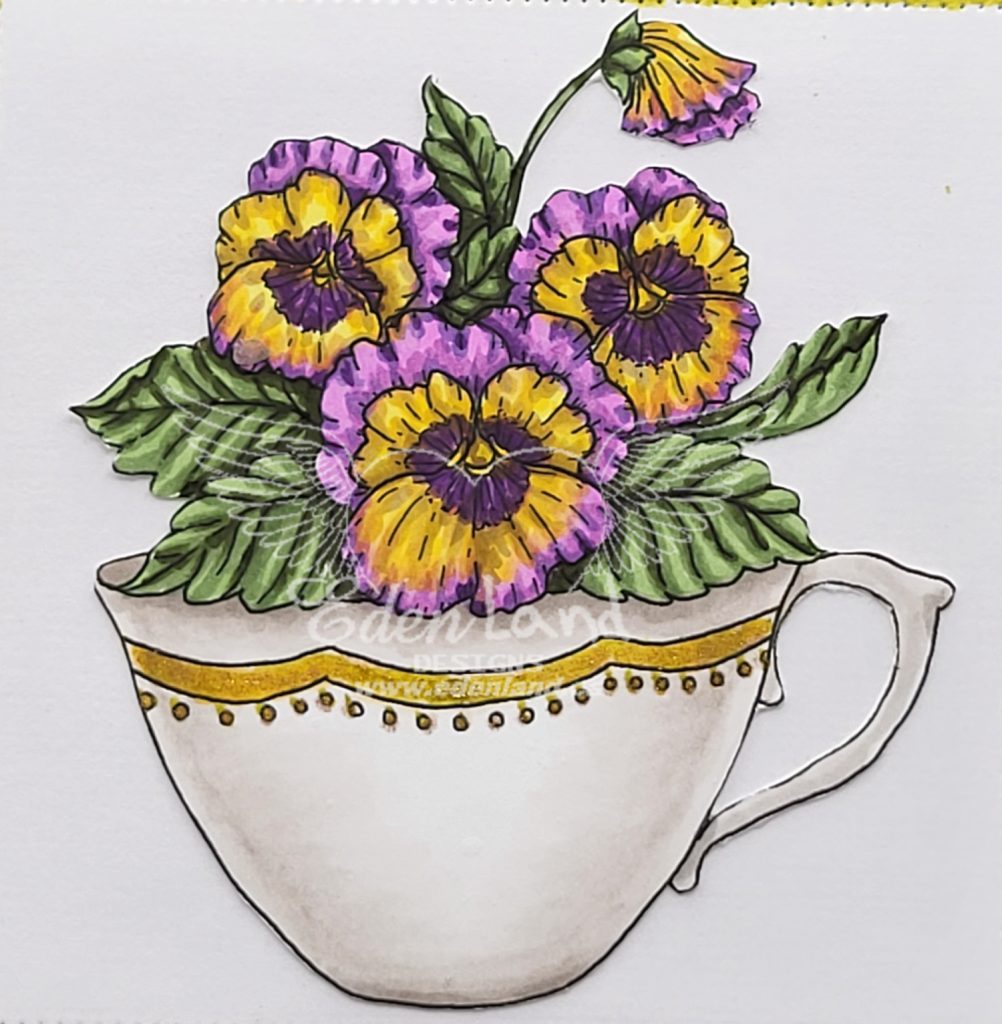
Hi there 🙂 I’m finally getting around to catching up on blogging some of the stuff I made a while ago!!! Each year, I like to make myself a desk calendar for my desk at work – something pretty to look at as the days go by. This year, I used Tea Cup Pansies – my favorite flower – from Fred She Said. I colored it up with my Copics, using a very traditional pansy color pattern.
I used a bit of gold sparkle pen on the tea cup design, then used the same gold to color in the edge of the pretty shape that I die cut the image with. I printed off the calendar pages, then ran them through the sewing machine to perforate them. After stapling them together, I attached the pad to the calendar base. To hide the staples, I popped the image on the base with some adhesive foam, overlapping the edge a bit over the calendar pad.
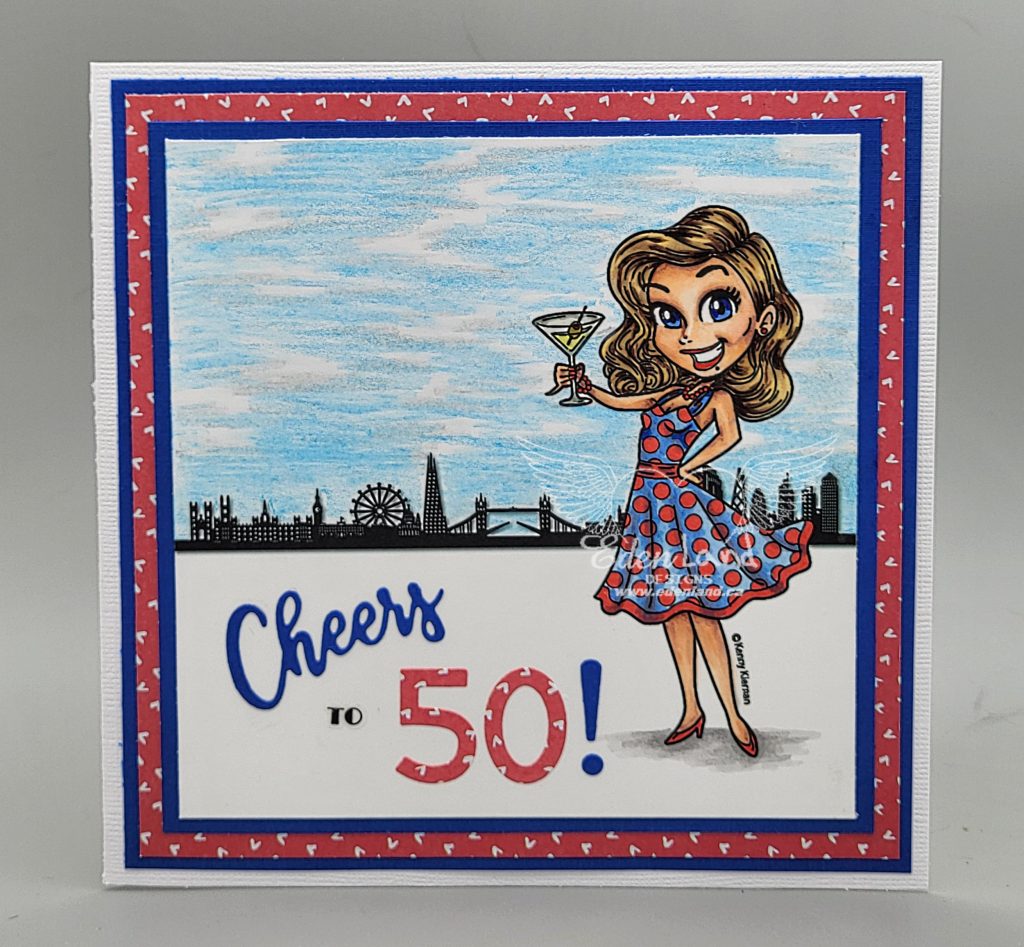
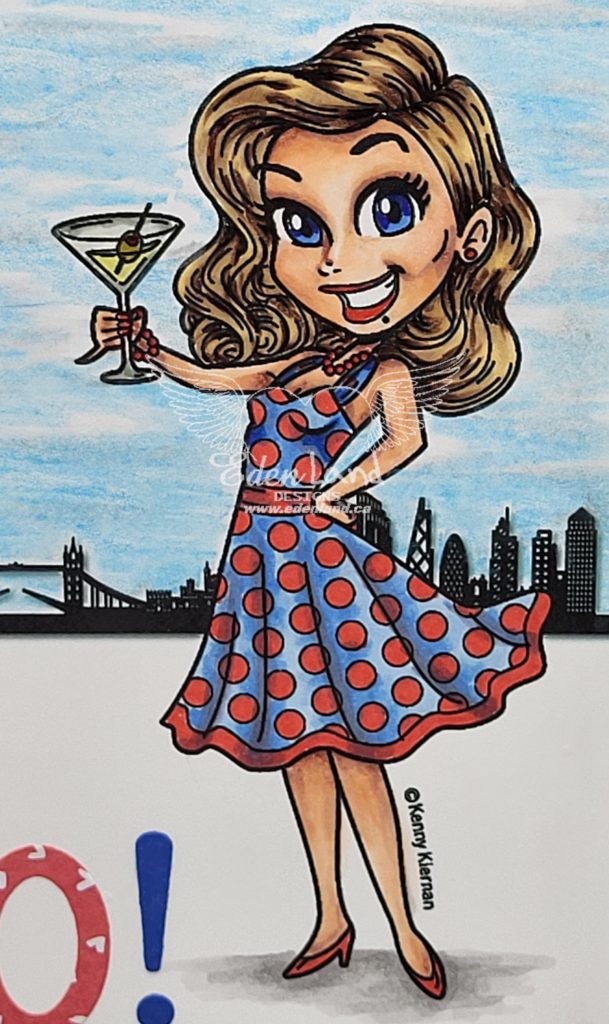
Hi there 🙂 I recently got an order for a card for a 50th birthday. The celebrant will be going to London to celebrate this milestone. I was also told that she liked her drinks….which led me to think on this image from KennyK! I’m so glad that I got the images that I did, before the store closed down! I looked around online, and found a silhouette of the London skyline, and merged the image with it. After coloring the image with my Copics, I pulled out my Prismacolor pencils to do the sky background.
I used the colors of the UK flag as the inspiration when coloring, and when finishing off this card. I die cut the sentiment, then matted the image with the same papers. I absolutely adore how this turned out, and so did the recipient!! I even managed to guess the hair color right, lol.
I’d like to enter this in the following:
613 Ave Create – February ATG with optional twist – Use Red for Anything but a Heart
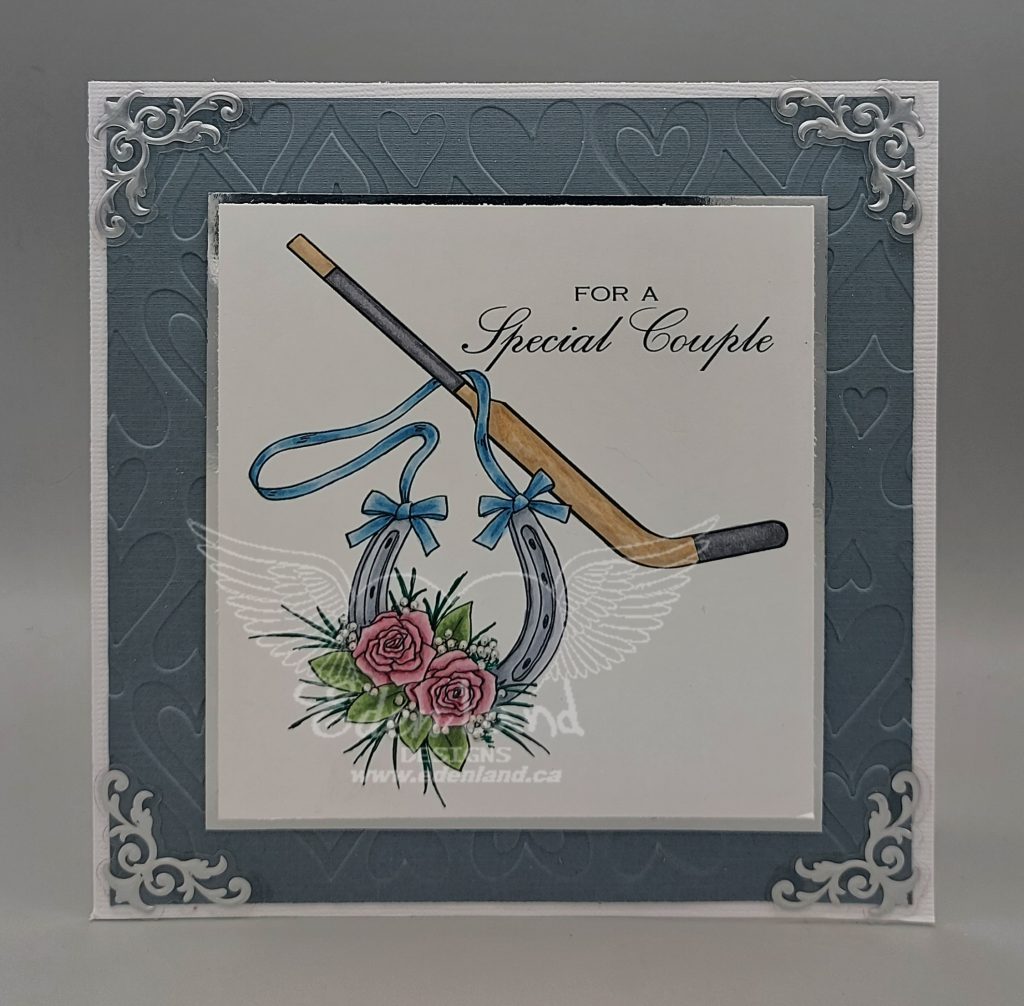
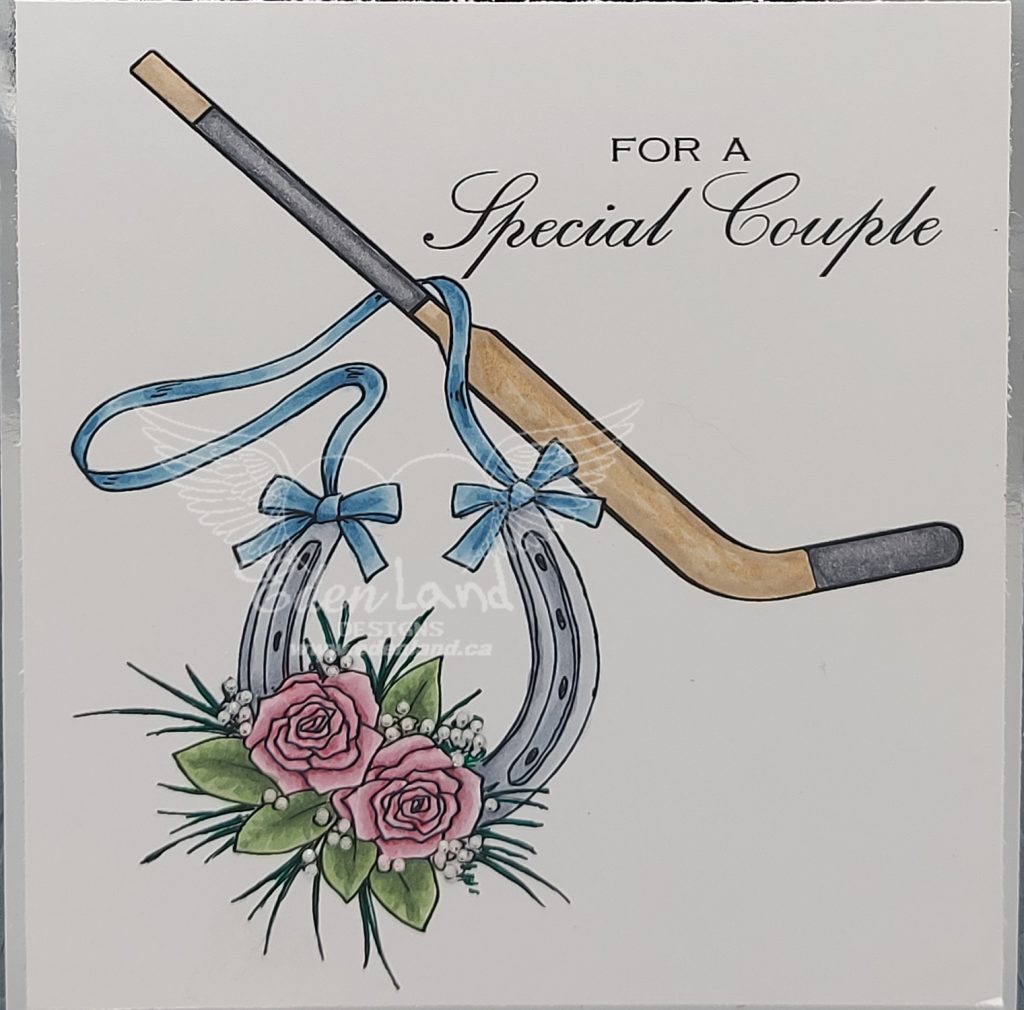
Hi there 🙂 This card was specially made for an extra special couple. Both the bride and groom are the children of good friends from different periods of my life. It was amazing when I found out they found each other, and even more so watching their love blossom. The bride is a huge horse lover, and the groom has been a hockey goalie since he was about 3!! So, of course, I had to put together a card that really depicted the both of them! I had the Horseshoe and Rose image, from Just Inklined (sadly, this store has closed), and found a goalie stick image online, then merged them together. I added the sentiment before printing. I found out the wedding colors, and used that scheme to color this with my Copics.
After I finished coloring, I very carefully placed teeny tiny rhinestones around the flowers, to give a bit of bling. I matted the image with silver mirror card, and placed it on a background that I’d embossed with hearts. Some silver foil sticker corners finished the card off.
Hi there 🙂 It’s time for another challenge over at Creative Fingers 🙂 We’re always ATG, and this time, we are being sponsored by our own Angelique, who will send this prize out to our lucky winner.
I made this card for my kid’s (who is a bit of a plant nerd) birthday. I made a box card, without the flaps, out of terra cotta colored card stock. To make it look more like a plant pot, I added an extra strip around the top. I die cut a bunch of leaves from green velvet paper, because I wanted this to be a pot of African Violets. After positioning these in the pot, I die cut 3 violet blooms, and tucked them in. It still looked a bit blah, so I thought of the plant arrangement I got for my birthday, and cut out some ivy vines from cream paper, then added the green with my Copics. A gold peel off sentiment was the perfect finishing touch 🙂 I’m happy to say that my kid loved this card!
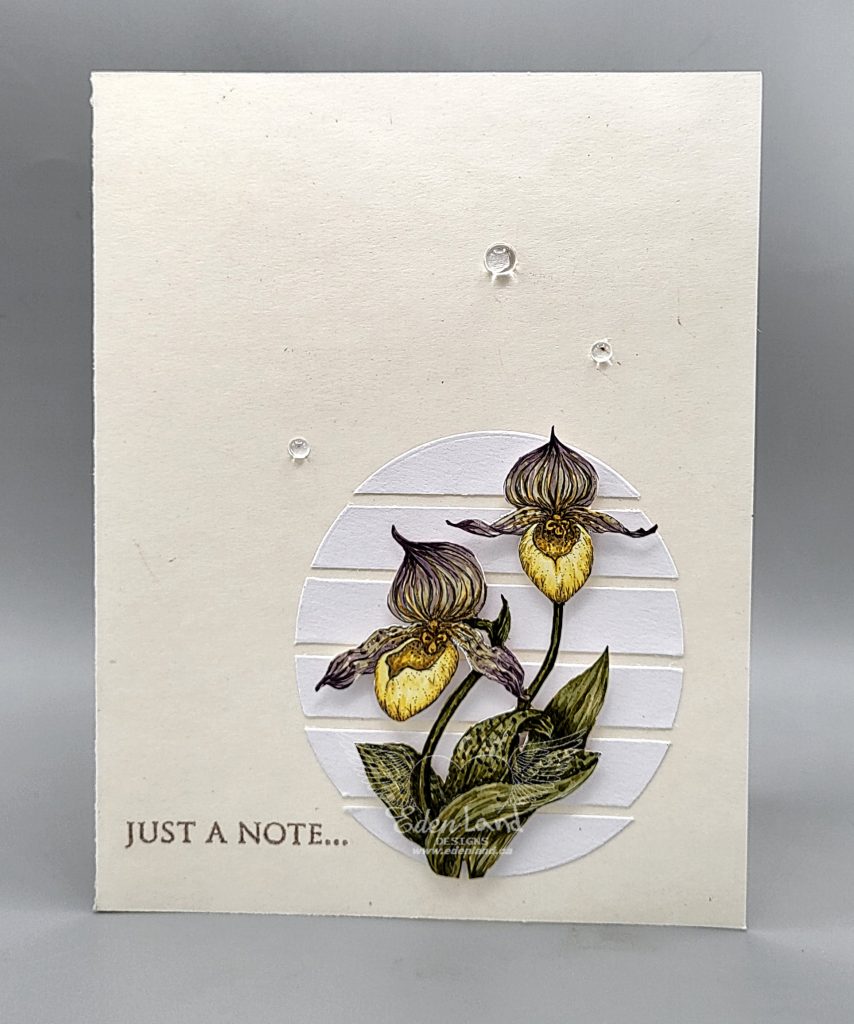
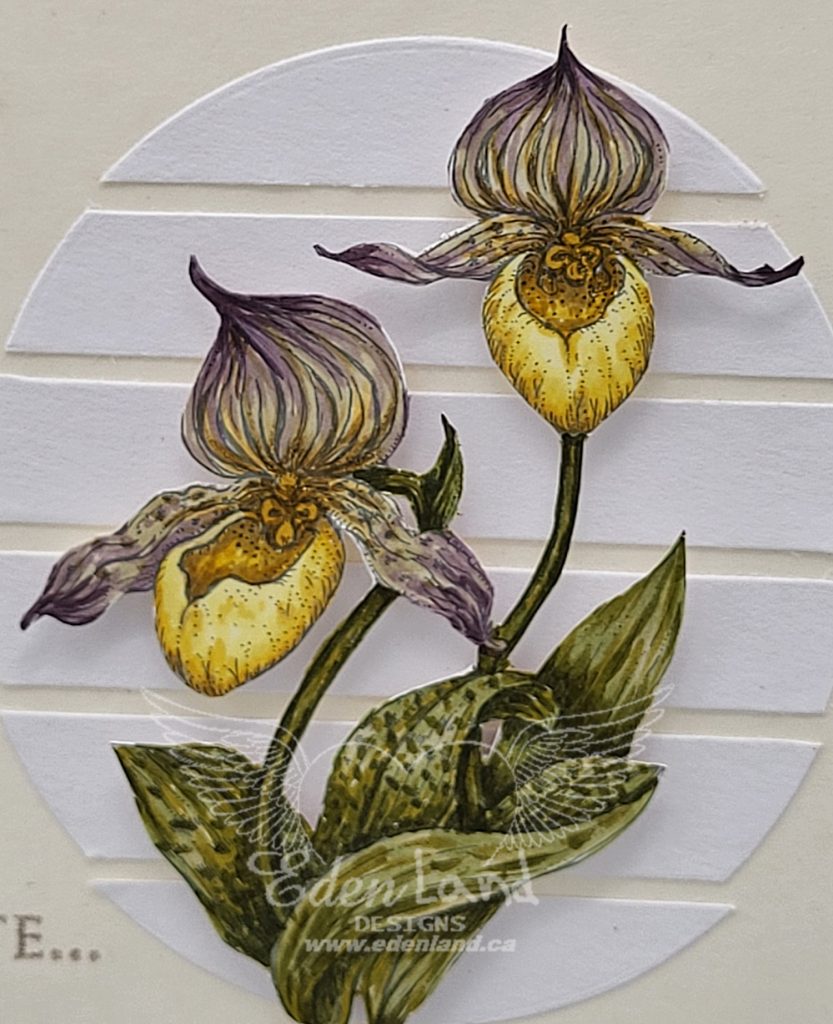
Hi there 🙂 When I saw this Lady Slipper Orchid image at Power Poppy, it brought back such wonderful memories of my mom and dad, that I had to have it. Growing up in the Canadian prairies, there was such an array of beautiful wild flowers throughout the spring and summer. My dad and I had a bit of a race who could bring mom the first handful of any particular flower. He worked at a provincial park, so he would often beat me, but I almost always won with Lady Slippers!! They are an endangered flower in Manitoba, so it’s frowned upon if they’re picked, and you most definitely can’t dig them up to transplant!! Well, considering this, he wasn’t going to pick them at the park, so I would trudge through the ditches on our gravel roads, until I’d find one of the massive patches of Lady Slippers and pick a small bouquet for mom. I showed her one of these patches I found, when I say massive, I mean massive!! She figured one little plant wouldn’t make a difference in the survival of the species in our area, so dug one up to put in her garden. Dad was horrified!! She just gave a little snort, and told him not to give any conservation officers a tour of the garden!! No more was said, lol. I colored this beautiful image up with my Copics, then fussy cut it out.
Power Poppy‘s current blog challenge calls for a CAS card, so that’s the route I took!! I die cut a white circle, then sliced it into strips, which I glued on to a cream card base, leaving spaces between the pieces. I stamped a simple sentiment (will have to send a little letter to my sister in New Mexico with this!). After popping the image onto the circle pieces with foam dots, I added a few dew drop embellishments for a bit of embellishment.
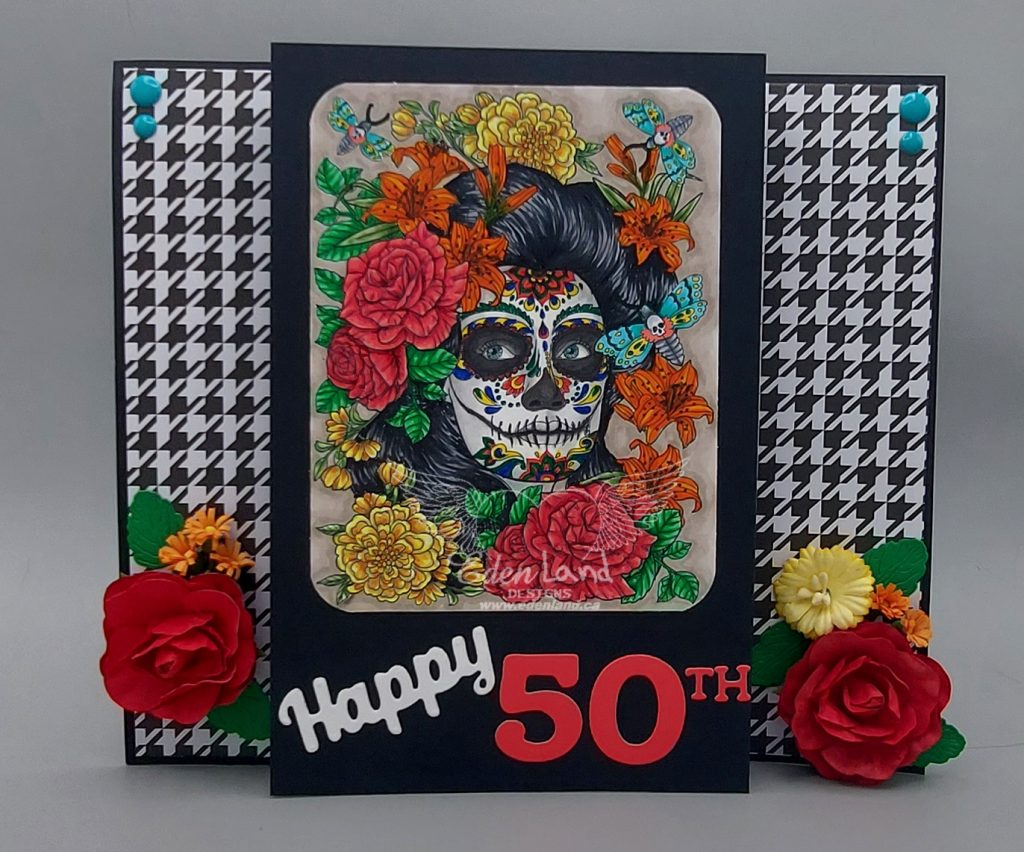
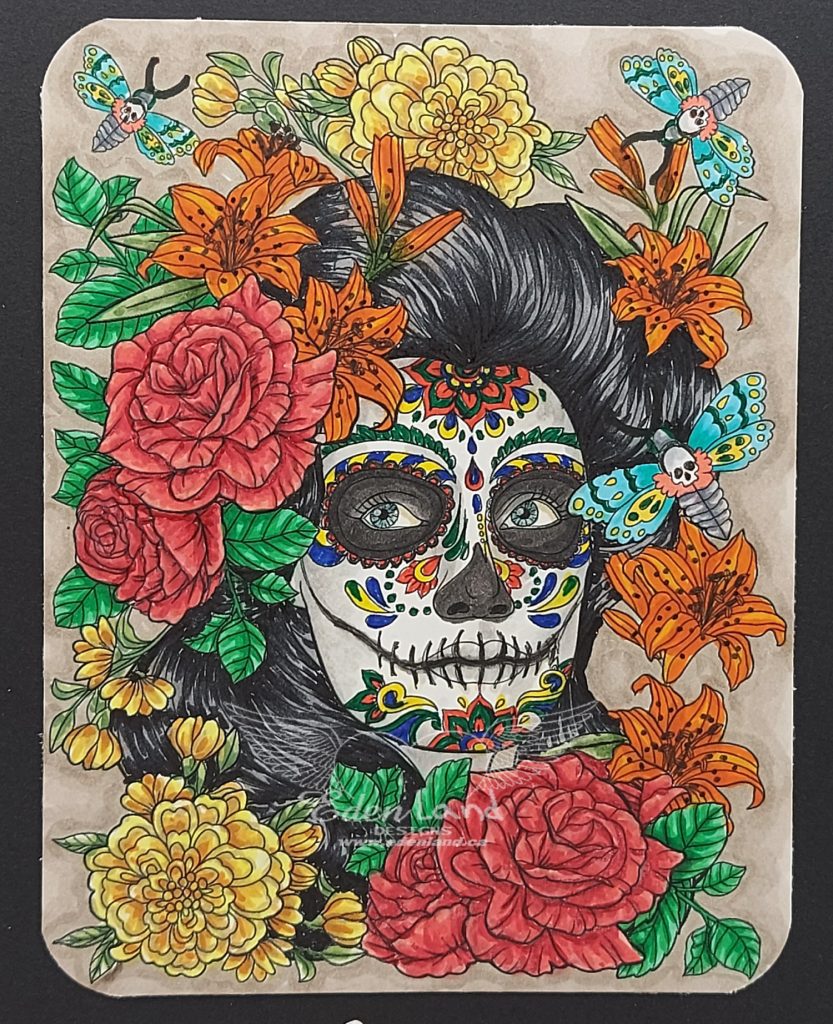
Hi there 🙂 I’ve been taking a bit of a break from blogging after the frantic Christmas rush!! I was asked by a friend to make a special 50th birthday card for her sister, who loves Day of the Dead images. I found this amazing image in the Paper Fun Etsy shop. I colored it up with my Copics, finding amazing details along the way!
I used a bit of a different card fold, don’t know what it’s called, or even if it has a name!! The 2 side pieces partially tuck behind the image panel, but when it’s popped out, it displays really nicely! I found a few pieces of houndstooth check paper for the side panels, and die cut a 50th sentiment to place beneath the image. To finish off, I arranged some flowers on the sides – amazed myself at how well they went!! A few turquoise enamel dots bring in the colors of the little skull bugs in the image. I’m happy to say that my friend, and her sister, were very pleased with this 🙂
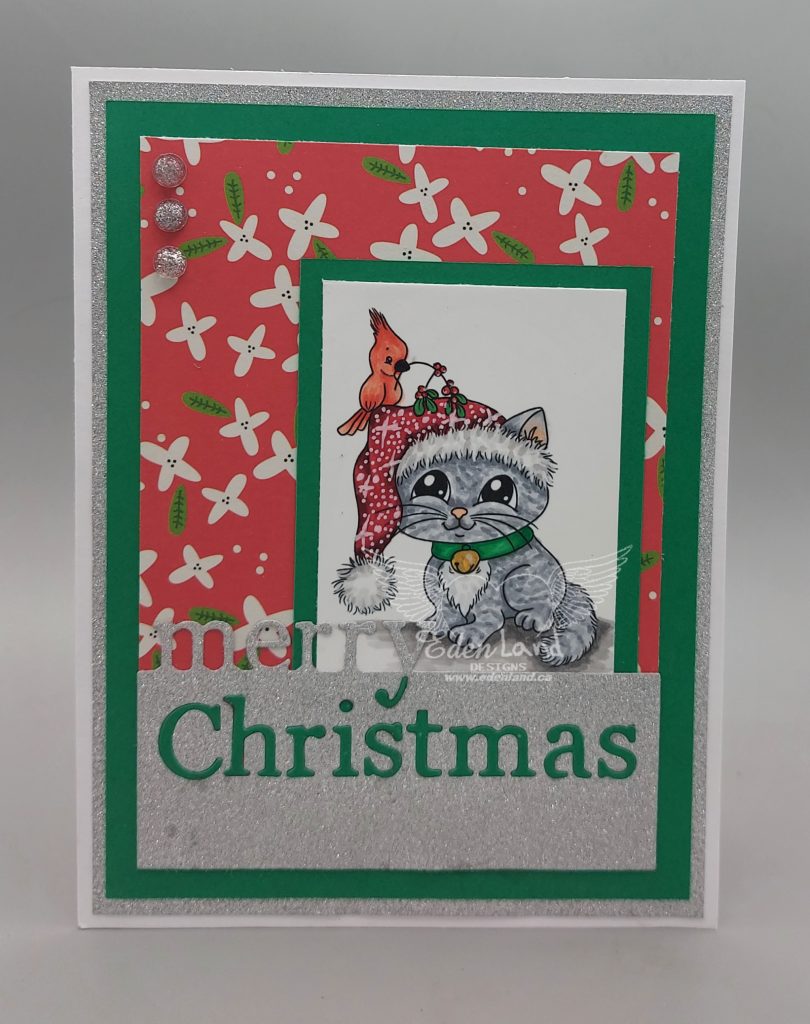
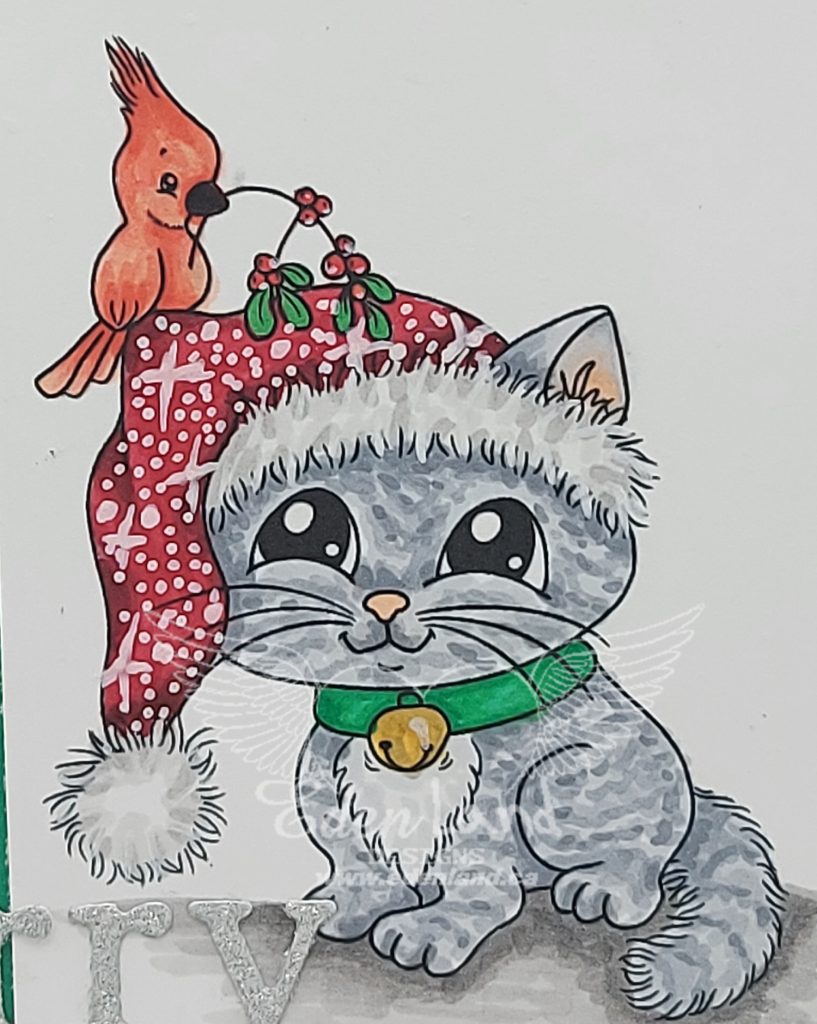
Hi there 🙂 I think this is my last Christmas card to blog!!! I made this for a sweet little one that loves kitties!! The image I used is from Imagine That!!! I can’t access their blog to link to them, however! I colored this little guy up with my Copics, to look like a soft tabby, and used my white Posca to give his hat a sparkly effect.
I picked out a background paper, and matted both the image and background with a Christmassy green. I die cut the sentiment out of sparkly silver paper, then inlaid the bottom part with the same green I used for a mat. To finish things off, I added an extra mat with the sparkly silver, and a few sparkle ball embellishments.
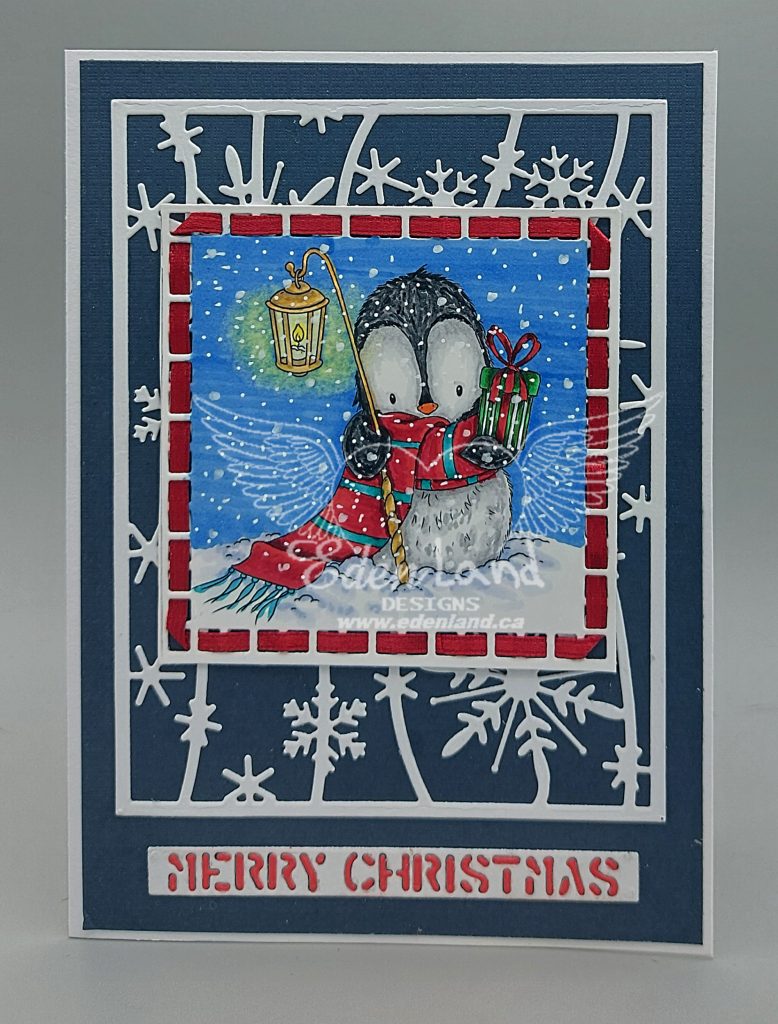
Hi there 🙂 Here is one of my last Christmas cards. I absolutely adore Lee Holland‘s sweet images, and used one for this card. I colored up Penguin With Lantern with my Copics, then added snow with my white Posca pen.
I cut the image out with a pretty framed die, then wove some thin red ribbon through the edges, to give it a bit more oomph! For the background, I layered a snowflake die cut over some deep blue cardstock. To finish things off, I die cut a Christmas sentiment twice, so I could inlay the white piece with the red lettering. The wintery feel of this card is just what I was going for!!!
Hi there 🙂 Happy New Year!! Let’s hope that 2023 is a kind year for everyone. I’m still trying to get the last few Christmas cards blogged. It’s amazing how fast time flies during the holidays!! I couldn’t make a ton of cards without using an image from Aurora Wings, and one of Mitzi’s sprites always seems to bring a smile to a person’s face 🙂 I colored up the sweet Candy Cane Sprite for this card, using my Copics. After cutting her out with a circle die, I cut a red circle to frame her on the dark green background.
What can be more festive than traditional Christmas colors, and a bunch of candy canes and peppermint candies? I die cut an assortment of sweets, adding a bit of sparkle on the candies to imitate sugar. I arranged these around the image, leaving room for a fun red and white die cut sentiment. Some red and white matting finish this card off.