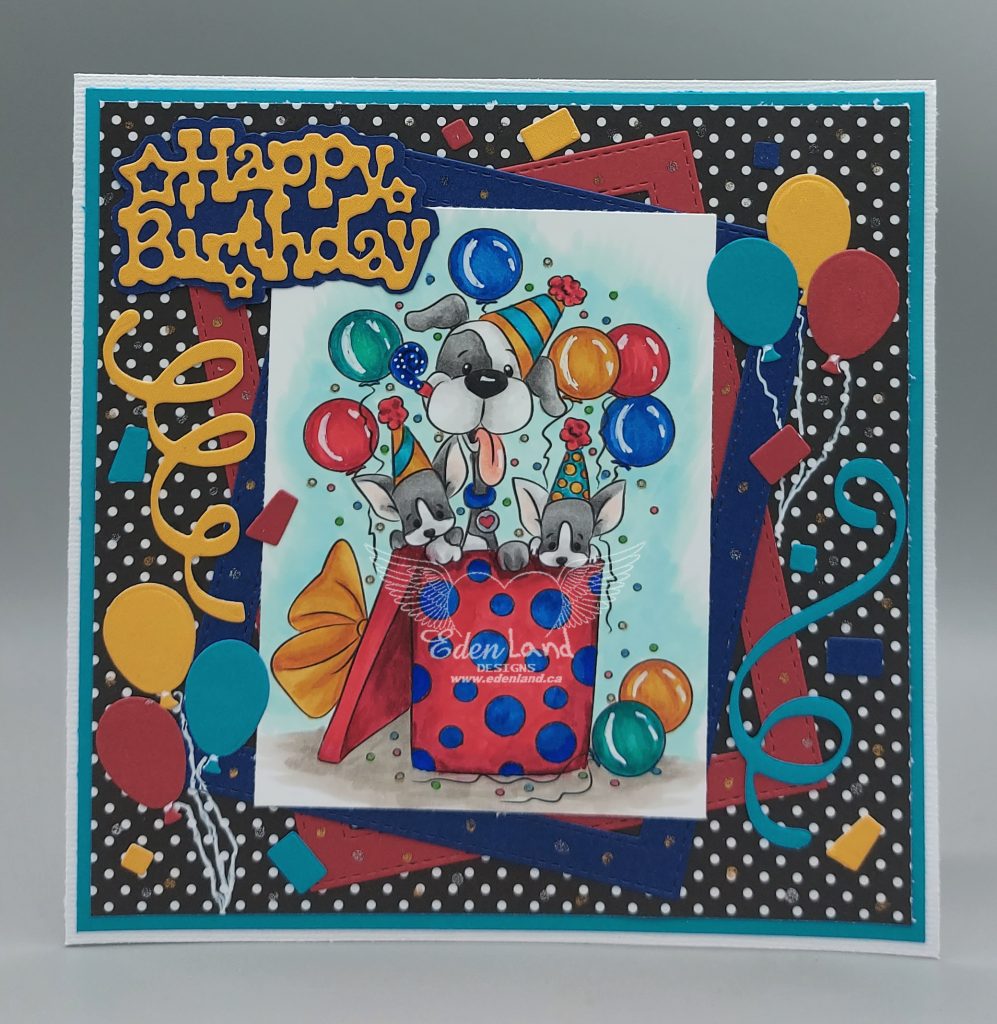
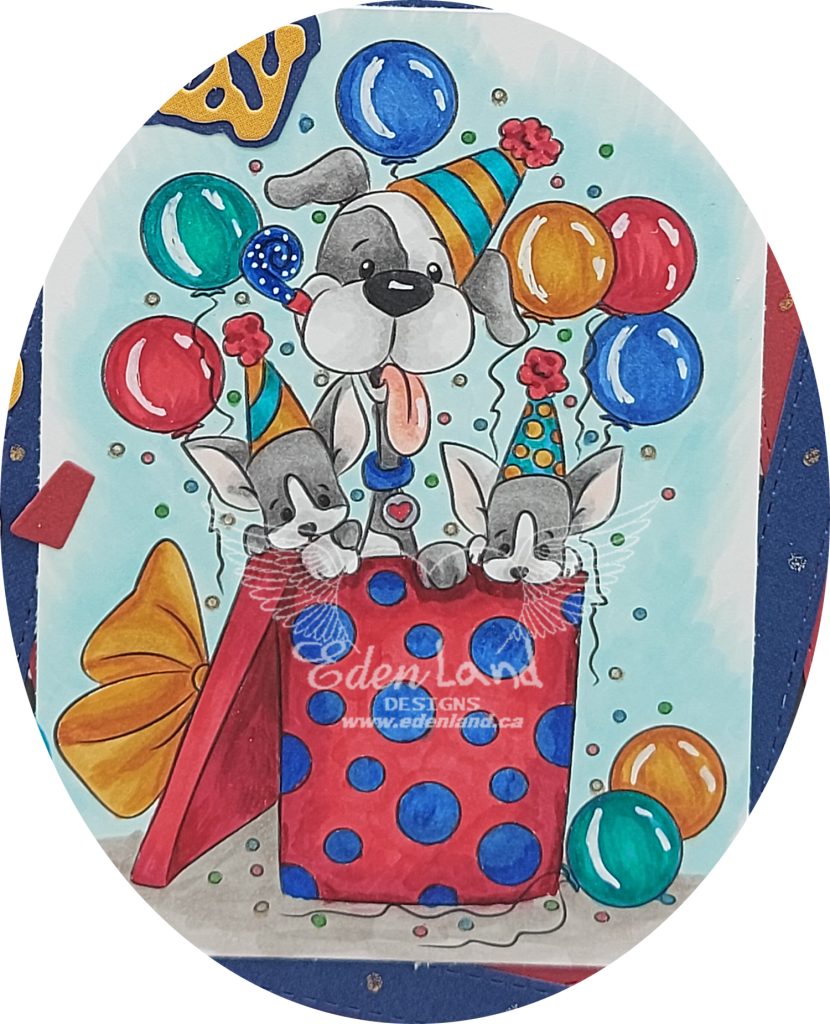
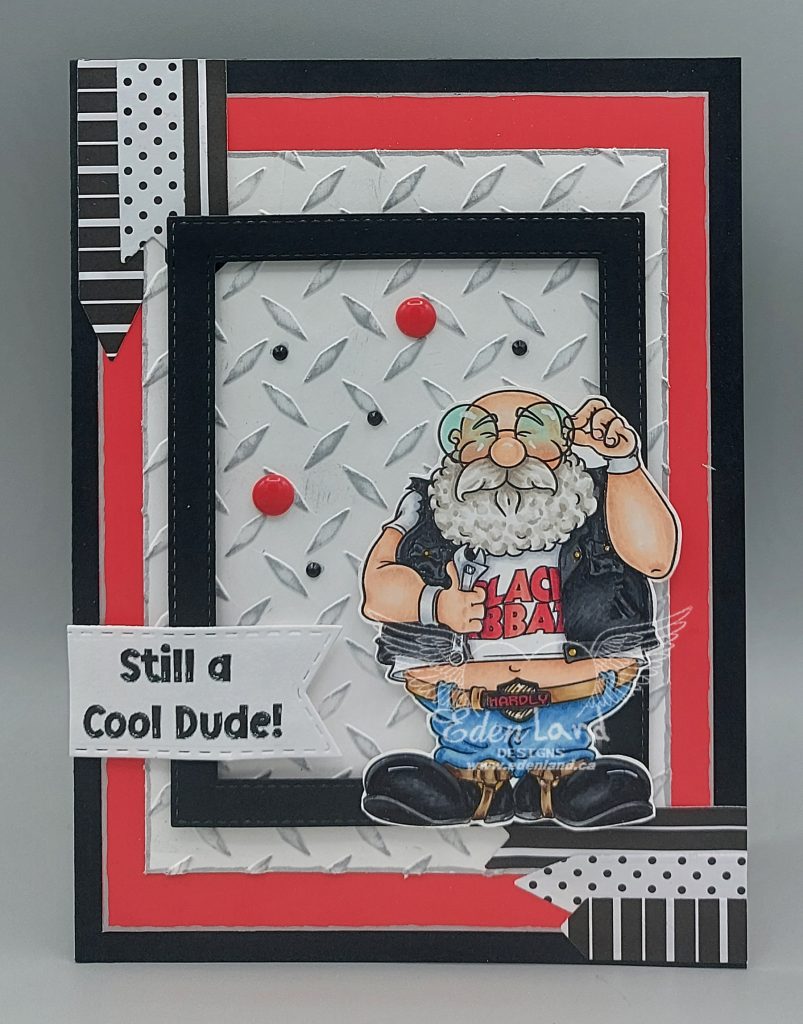
Cool Dude

Good morning πŸ™‚ I have so many men to give birthday cards to, and so few cards, that I figured I’d better get going and make some!! One of my coworkers is in his 60’s, and is such a joy to work with….he really is a cool dude!! This image from Dr. Digi, Aubery Bumblethope, actually looks a bit like him, lol. I colored the image with Copics, then fussy cut it out.

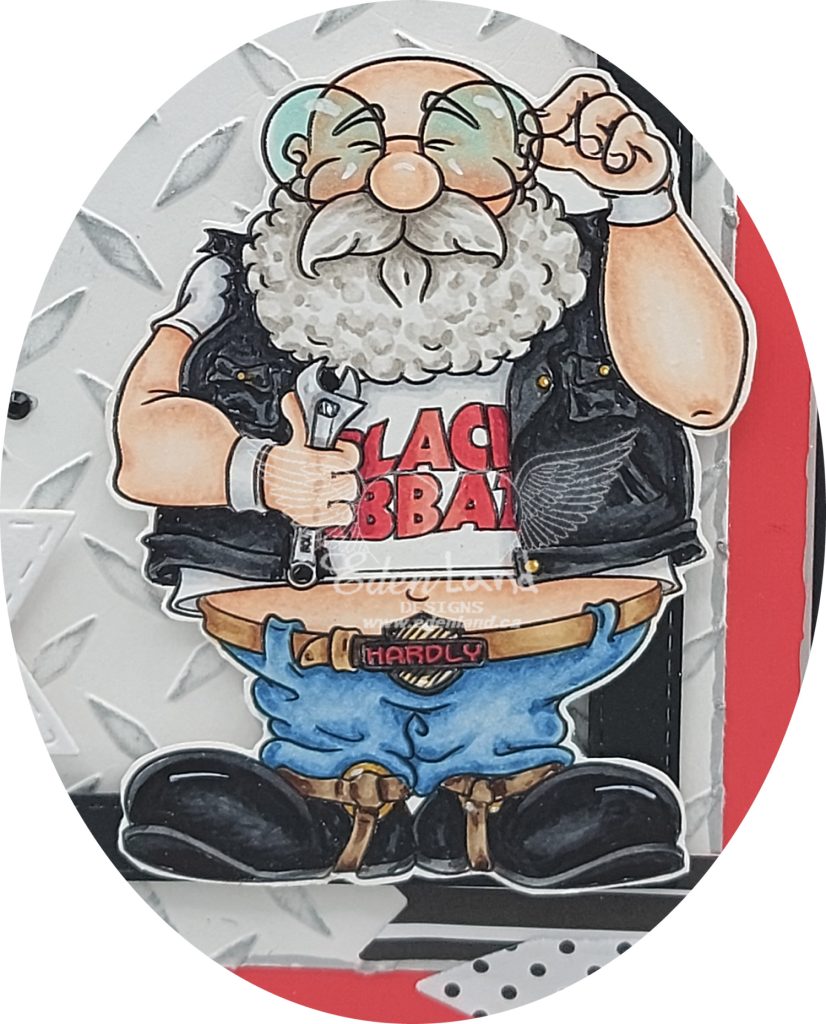
The colors that I chose to use on the image lent themselves to make a card with my favorite color combo πŸ™‚ I embossed a piece of card stock, then brushed a silver ink pad over it, to give the design a bit of definition. I die cut a stitched frame, and multiple banners from pieces of scrap paper, and layered it all together with a piece of red CS that I’d edged with a silver pen. The sentiment was printed out and cut out with another die. To finish off, I added a few red and black embellishments.

I’d like to enter this in the following:

Passion for Markers – Week 627 Add a Sentiment

Simon Wednesday Challenge – Emboss It!

Crafty Catz Challenge – #581 ATG with optional Anything but Square

Colour Crazy Challenge – Week 5 ATG

DL Art – February ATG Linky Challenge

Simple Sympathy

Hi there πŸ™‚ I was going through my card stash, and found that I was very low on sympathy cards – probably because they are difficult ones to make. I decided to continue with this years resolution of using the stuff that I have that’s been sitting around collecting dust. I embossed some feathers from the stamp set by the same name by Hot Off the Press. I used some cool Seth Apter embossing powder, although, now, I’m thinking that it doesn’t really give the detail of the feathers (but the patina is great!) I added a simple sympathy sentiment and a few coordinating pearls, before matting it with another slimline die cut. A very simple and understated card, but that’s how I like these ones πŸ™‚

I’d like to enter this in the following:

Stamping Sensations – February ATG with the option of Wings or Tails (well….I used parts of wings, lol)

Pammie’s Inky Pinkies – #2206 ATG

Scrapping 4 Fun – #209 ATG

We Love Stamping – February ATG with option of using a stencil – didn’t use the option

Toot!

Hello there πŸ™‚ I had a bunch of random images printed up, so decided I better get to it, color them, and make a few cards πŸ™‚ This trumpet is from Opal Manor. They used to have a site with tons of free digis, but I see the domain is now an Asian porn site (thus, no link!!!!). I colored the image up with Copics, then fussy cut it out. I thought the background paper I found was perfect, as it had the strips of music running through the fun print. The sentiment was running through my head, so printed it, then framed with a die cut frame. I attached the image, then added a few blingies and some gold sparkle pen dots to the sentiment to give it a bit more oomph! The inside of the card reads “You deserve every note! Congrats!!” A nice card to have on hand for when a family member or friend accomplishes something big (or small).

I’d like to enter this in the following:

Path of Positivity – #98 Anything Positive Goes (didn’t use the optional theme)

Crafty Calendar – February ATG

Allsorts Challenge – #662 AG (didn’t use the Red Flowers option)

DL Art – February ATG Linky Challenge

Geometric Birthday Card

Hi there πŸ™‚ Well, I’m late at posting this for Creative Fingers Challenge Blog….I’d like to say I’ve had a good excuse, as I’ve dealt with my website totally crashing for unknown reasons, a nasty blizzard, and after getting through that safely, an even nastier (my first) car accident. I’m fine, but so very shaken up, and the thought of driving now makes me more than a little bit queasy and anxious!! Anyway, no time to mope, got a blog post to write!! Our sponsor this time is the wonderful Angelique, who is offering these “love”ly heart stickers.

I’ve made a vow to dig into my scrap drawer as much as possible this year. IE: use more than I deposit!! Lol. I also want to use all these stamps and dies that I just had to have, and have remained unused!! I managed to do both with this card, which is a bit different for me, as it doesn’t have a colored image on it. I used a scrap of silver mirror card to cut the geometric shape with a Scrapman die, then used it again to cut a white piece, so I could inlay the teeny weeny ridiculously small pieces. I die cut a birthday sentiment, then used scraps of black and white to layer it on, then attached it to the card with foam dots. Some matte black and shiny silver embellishments finish the card off….and I didn’t even put anything back into the scrap drawer!!!

I’d like to enter this in the following:

Creative Crafting Uncles – #25 Happy Birthday

Lil Patch of Crafty Friends – #175 ATG

Pixie’s Snippets Playground – #421 ATG with Snippets

This Year’s Calendar

Month by month flip through πŸ™‚

Hi there πŸ™‚ Well, this year’s wall calendar is a wrap!! I do my calendars from February of the current year, to January of the following year. This is because December is such a busy time, with Christmas cards, baking and other holiday preparations, that I just don’t have the time to devote to a calendar. I decided to do a floral calendar for 2022, and as I was browsing through my images, trying to find enough coordinating ones, I remembered a coloring book that I purchased from Coloring Book Cafe!! 100 Beautiful Flowers has beautiful images of almost every kind of flower, succulent and houseplant imaginable! I’m not a coloring book type, but most of the images in this PDF book are suitable for cards…..or a calendar!! After coloring the images that I’d chosen with my Copics, I printed all the monthly pages, adding holidays and a full moon symbol where applicable. Then, I had to come up with a page design. It has to be fairly light and not super layered, as it will tear and fall off the wall if it has too much weight. I decided on a simple black and white, with a strip of white die cut lace. I used keychain rings to attach the pages, as I have about a bazillion of them, and they’re easy to use, once you get the hang of threading the pages πŸ™‚

An example of a full page spread πŸ™‚

Now that I’m done this project, my mind is buzzing, trying to figure out what I’ll do next!! I guess housework might be a good idea for a while….blah.

I’d like to enter this in the following:

Creative Knockouts – #437 Die Cuts/Punches

Through the Craft Room Door – ATG February 1st

World Wide Open DT Challenge – #01 ATG

Classic Design Challenge – #2 February ATG

Jan’s Digi Stamp Challenge – January ATG

LOVE

Hi there πŸ™‚ Time for a brand new challenge at Creative Fingers πŸ™‚ As always, we are ATG, and have a fabulous sponsor. This time, that sponsor is our very own Tindaloo!! I chose the Love Doodle Wordart for my inspiration card. I used my Copics, and a gold Posca pen to color it in, so it coordinated with the background paper I’d chosen, but still has a bit of a red POP!! I fussy cut it out, and glued it on a piece of ivory CS that I’d stamped the rest of the image on. Everything was matted with black, to make for a bold, simple anniversary card πŸ™‚ I really hope you can join us for our challenge this time, and please do check out Tindaloo’s Etsy shop!!

I’d like to enter this in the following challenges:

Time Out Challenge – #205 In Love

Penny’s Papercrafty Challenge – #513 ATG

Word Art Wednesday – ATG weeks 527 & 528

Pammie’s Inky Pinkies – #2203 ATG

3D Birthday Pup

Hi there πŸ™‚ I decided to try something a bit different for this birthday card….well, different for me!! I’ve had this Spellbinders layered Happy Birthday die for some time, and have used the elements separately, but have never used it the “right way”. I used a sweet image from Goha Digital Stamps, and practiced my black animal coloring with my Copics.

After fussy cutting the image out, I set to assembling the card. I used a red card stock for the base, scoring the sides, and cutting a window out for the first layer of the 3D look. I cut the sentiment and the balloons out of white card stock, carefully lining up the cuts with the front window. I layered some color cuts onto the balloon window. On the back panel, I cut a circle, the same size as the front window, from some mirror card, just to add even more dimension to the card. Some extra, colorful balloons finished off, and balanced out the front panel. After assembling, I glued on a back panel with a greeting, and plenty of space to write a personal message.

I’m pretty happy with the end result, however, when I make a card like this the next time, I’ll cut the middle layers a fraction smaller. This time, I cut them the exact size of the front, and when the card was assembled, there is a slight bow….I guess the folds make it necessary to make the middle pieces a hair narrower πŸ™‚

I’d like to enter this in the following:

Polkadoodles Craft Challenge – Week 2 ATG

The Corrosive Challenge – #1 January ATG

Dies R Us Challenge – #184 ATG

Dream Valley Challenges – #261 Anything New (technique)

Double D Challenges – 6th Birthday Party Balloons Challenge

2022 Desk Calendar

Hi there πŸ™‚ The first challenge of the new year at Creative Fingers is starting today, and we’d love it if you could join us. The theme is always ATG, so anything your creative minds come up with is welcome! Angelique is sponsoring, offering this stamp set with some fabulous sentiments.

I like having a calendar on my desk at work, so decided to make one for my DT inspiration. The image is a freebie from Kanoko Egusa, and was just too pretty not to use! I colored it up with my Copics, then fussy cut it out. I die cut the 2022 out, then popped it on the image using foam dots. I printed and cut the monthly pages out, then ran the the tops of each through my sewing machine to perforate them, before stapling them together. That’s where I ran into trouble!! I must have been looking at things wonky, because the staples were crooked, and wrecked the look πŸ™ I solved the problem when I was assembling the calendar, by adding a strip of paper and a pretty die cut bow over the stapled part. I made sure it didn’t interfere with tearing off the months when needed πŸ™‚ I found this tutorial on Pinterest for the design of the calendar base.

I’d like to enter this in the following:

Penny’s Paper-Crafty Challenge – #512 ATG

Digi Choosday – Week 1 ATG

Pammie’s Inky Pinkies – #2201 ATG

Through the Craft Room Door – ATG challenge beginning Jan. 4

Let’s Craft and Create – Challenge #179 – AG + Something New

Scotty Christmas

Hi πŸ™‚ Every year, I make a Christmas card for my sister that features a Scottie dog <3 This one took forever and a day to get to her, and when it arrived, it was in a bag, because the envelope and card had been badly ripped by the sorting machines πŸ™ I figured I’d post it, so she could see what it was supposed to look like!! I saw an I-Crafter die set used on a card in one of my Facebook groups, and went on the search for it, as it was perfect (2 pups with a bow and a little sentiment). I cut the little guy out from a scrap piece of black. I arranged him jumping up on a simple Christmas sentiment. Of course I had to use plaid for background, because…well….Scottie!! I cut a top border, then placed a string of lights that was cut with the coolest Joycraft die set. Then comes the fun…..a little secret of mine is that I cannot seem to throw out even the smallest of glitter paper scraps!! Some are so ridiculously tiny, that I get tempted!! Well, I put those teeny pieces to good use with this card!!! I cut the light bulbs out of some different color sparkle pieces, and also added a sparkly red bow to the pup. A bigger piece (maybe 3/4″ x 2″, lol) was used to cut the letters out to inlay the sentiment die.

I’d like to enter this in the following:

Pixie’s Snippets Challenge – Challenge #418, anything Christmas or New Year’s with snippets

Christmas With the Cuties – #56 ‘Twas the Challenge Before Christmas, I revisited challenge #49, Festive Furries

Winter Wonderland – End of Year ATG Challenge

Party Pups

Hi there, and Happy 2022!! I’ve really let my blogging (and other things!) slide in the last few months, but I’m letting the new year be the impetus for getting back into it!! What better way to celebrate, than with bright colors ?…..and doggies, of course πŸ™‚ I love this image from Digi Doodle Studios, as it has such versatility, for both male and female cards, young or old!! Party Pups are ready to have some fun!! I colored the image with my Copics, then added a few accents with white Posca, and glitter pens.

I picked a black polka dot background paper, as it provided a neutral, but fun, base for the brightly colored image and die cut accents. I went into my scrap drawer, and started die cutting frames, balloons, confetti and a sentiment. Lots of little pieces were used up!!! I arranged all the pieces, then added some strings for the balloons with white Posca, and a number of sparkly confetti like dots with glitter pen. The sentiment was a bit lost, so I made a shadow for it by tracing around the outside of the die, then cutting it out πŸ™‚

I’d like to enter this in the following challenges:

Lil Patch of Crafty Friends – #173 ATG

Digi Doodle Studios Challenge Blog – #45 Be Happy and/or Your Favorite Things – Bright colors!!

Crafts Galore Encore – #95 ATG

Creative Knockouts – #433 ATG

Cut It Up Challenge – #242 Birthday Cards