Daisy Birthday Wishes

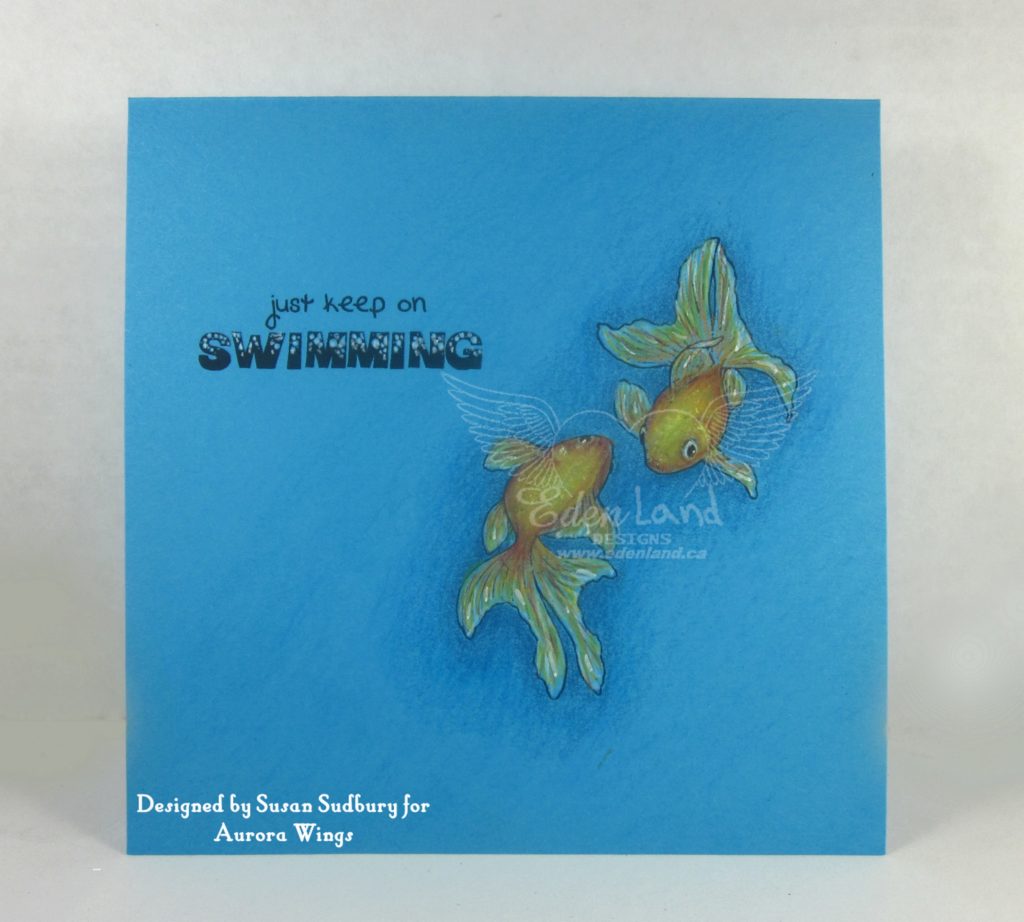
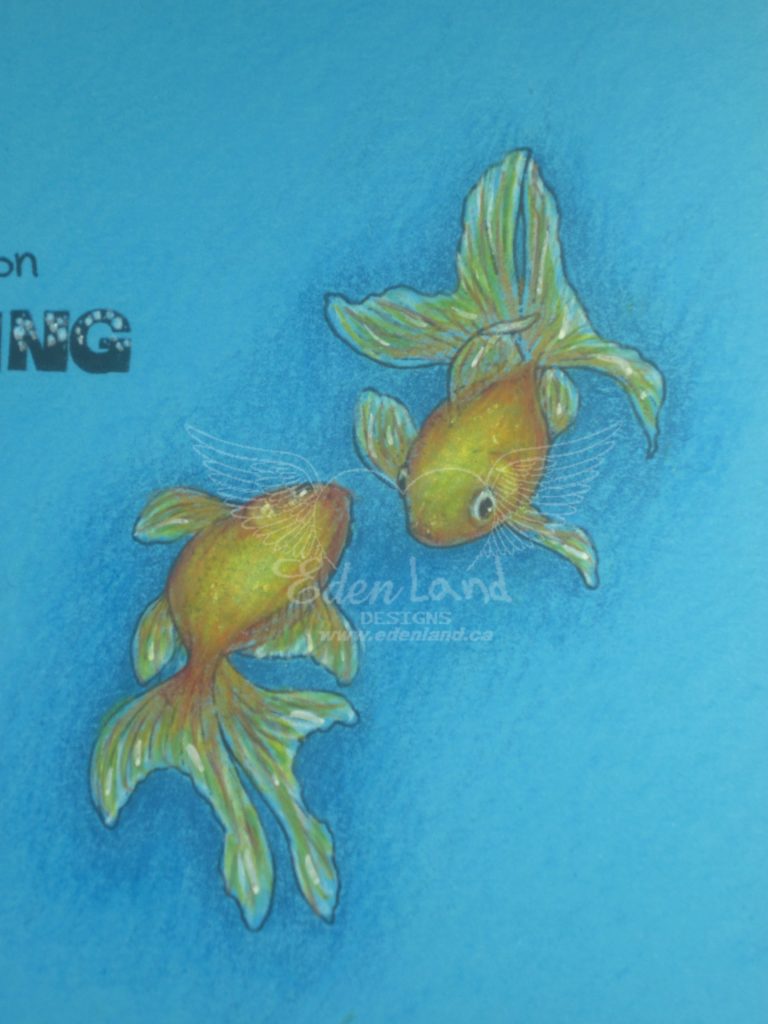
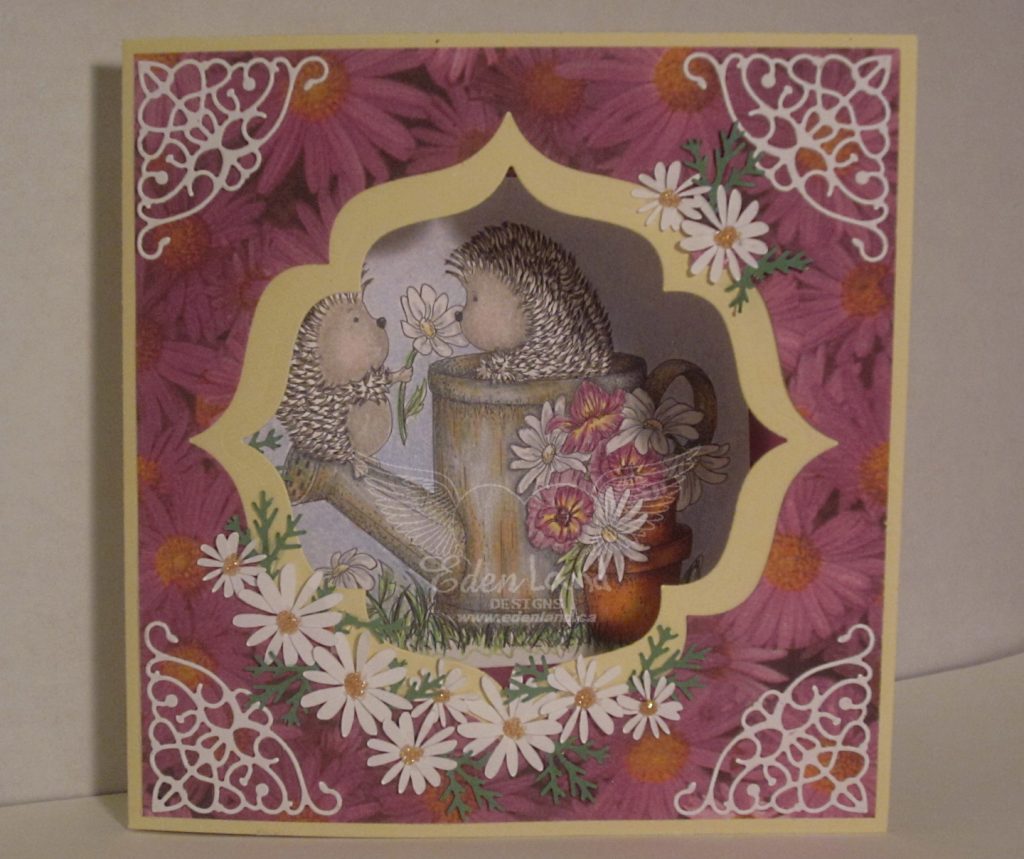
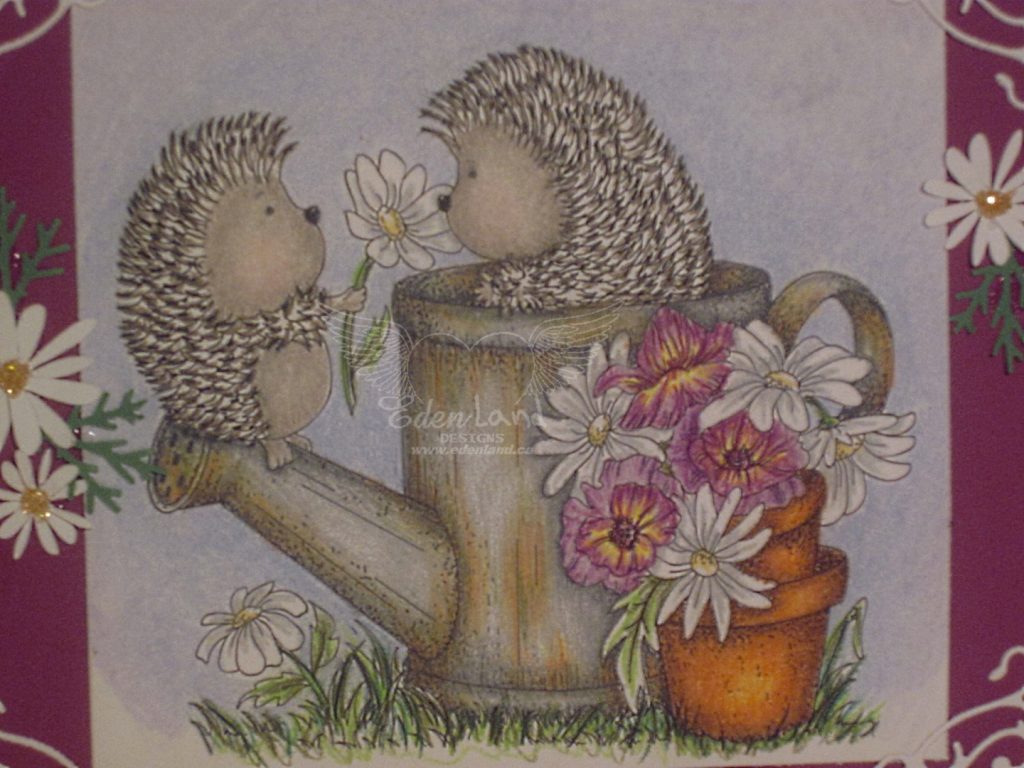
Hi there 🙂  I have a friend who loves daisies, and it was a special birthday for her (60!).  I’ve been eyeing up this sweet image from Di’s Digi Stamps for a while, but one thing or another kept coming up.  Well, I made it a priority to do it this time, so printed this adorable image, called Hedgehog Popsy Daisy, and colored it with my Prismacolor pencils.

It’s been a while since I’ve done a fancy fold card, and I wanted to implement a pocket for a gift card in this, so I went to work, wrecking more sheets of paper than I’d care to say……This project was a bit more “math-y” than I’m comfortable with lol.  When I finally got the folds and windows right, I started dressing things up a bit.


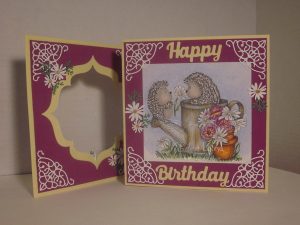
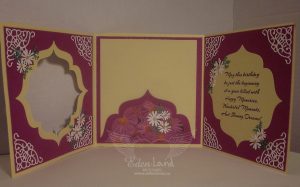
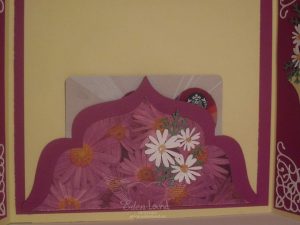
I’ve had the pretty pink daisy paper for quite some time, and this was the perfect card to use it on!!  I cut the lacy corners with a Cheery Lynn corner die, the sentiment was cut with a die that I threw the packaging out before recording the brand….my bad!!  The little white daisies were cut with my Cricut and Nuvo drops made the centres.  I used a MS punch for a bit of greenery.  I printed the sentiment on the computer and used the same shape die to cut it out as I used for the window.  The gift card pocket is cut with the same die again, which I cut in half.

I’m super thrilled with the finished product, and my friend was too 🙂

I’d like to enter this in the following:

Di’s Digi Challenge – Fancy Folds

Polkadoodles Crafting Challenge – Week 34 ATG

Aud Sentiments Challenge – #210 ATG + a Sentiment

Cute Card Thursday – #54 Just for Girls

Classic Design Team Open Challenge – #8 ATG

Dragonfly Gift Bag

Well, we’re in our final week of August, so this is my last inspiration piece for the Recycle challenge at the Ching-Chou Kuik Facebook group.  After using my Copics to color the dragonfly image from THIS set, available at Ching-Chou’s Etsy store, I added some silver dots around the edges with a gel pen.  After all my talk this month about how you can recycle almost ANYTHING, I was at a total loss as to what to do!!  That all changed one day at work, when my friend that owns the business next door came in to show me something, and before she left, left me a bag to throw out.  Well, you guessed right, that bag was way too nice to toss, and was a perfect starting point for a recycling project!!!  When I got home, I dug around, and came up with all kinds of things to decorate it with…ALL recycled!! The lace strip, I salvaged off of an old slip….who wears those anymore anyway??  The bow is something I dragged home years ago from a former job (they used to laugh at me for taking “garbage” home all the time)….it came off of a tag that we had to remove from some undergarments that we received….so I have about a bazillion little white bows.  As I never buy buttons anymore, any loose button is, of course, recycled from something!!!  When I was putting all of this together, I noticed that the dragonfly image was printed on the back of an “oops” printing….so I guess the paper is recycled as well!!!   Even the tissue that I used for the photo is recycled from another gift!  After being stumped, I’m quite thrilled with my completely recycled project!!!

I’d love to enter the following with this project:

PaperBabe Stamps Challenge – #80 ATG

Lil Patch of Crafty Friends – #88 ATG

Lemon Shortbread Challenge – #74 ATG

Through the Craft Room Door – ATG for the week of August 21st

Tuesday Throwdown – #406 Up In the Air

Christmas Robin

Hi there 🙂  There’s a new challenge going at the Sheepski Designs Facebook Group!!  As always, it’s ATG with a Sheepski image (found at the Etsy store), but if you’re stumped as to where to start, we have an optional theme….this month, it’s “winged things”.  Andrea has a ton of images with wings…..from cars to butterflies to pigs……but I chose this sweet Winter Robin for my card.  I’ve been making Christmas cards since January, so I don’t get caught in a panic when the season hits, and since it was +40C outside, I figured it was just the time to make another one, lol.  I colored the image with my Copics, then cut it out with a Xyron stacking die.

  My mojo was going strong up until this point…..then poof!!! Gone!! I had no clue what to do next!  I muddled around with papers and dies until I came up with this.  I used a curvy edge die on the warm red print piece, then a Tim Holtz holly die to decorate the blue.  I took my white gel pen and made the snowflake pattern behind the holly to match with the red paper, then cut a silver Merry Christmas sentiment to coordinate with the silver ball accents.  I was pretty happy with the end result, considering Mr. Mojo took off on vacation at the most inopportune time!!!

I’d like to enter this in the following:

Crafty Hazelnut’s Christmas Challenge – #400 Christmas ATG

12 Months of Christmas Link Up – #44 Add Some Greenery

Christmas Cards All Year Round – Use Warm/Hot Colors on Your Project

Crafty Hazelnut’s Patterned Paper Challenge – August ATG with Patterned Paper

ABC Christmas Challenge – P, Q, R  are for Plain, Quotes, Rabbits and ROBINS!

Sparkles Galore

Good morning 🙂  It’s my turn again to inspire you for our Recycle challenge at the Ching-Chou Kuik Facebook group 🙂  Since I never throw anything out (just in case, you never know if it can be made into something pretty!), I have lots of choices when it’s a challenge of this theme 🙂  I started this project with an empty notecard box.  I loved the shape and the construction of it!

I started by painting the whole thing with gesso, then got the lovely piggy pink paint out.  Not a pink person, but I had a special little girl in mind when I started this project 🙂  I was having huge issues with anything drying because of the humidity….but I persevered and got ‘er done 🙂  I colored the image, Rainbow After the Rain, with my Copics, and cut it out with a Wonky stitched rectangle die.  I glued it to the top of the box, then attached (not very) adhesive rhinestones around the edge.  I had to add some Glossy Accents to the rhinestones, as they just didn’t want to stick.  A few pink daisies, centered with more rhinestones, and the top was done 🙂

I had some pretty lace that I wrapped around the sides of the box, then added a pretty rhinestone clasp.  For the inside, I found a mirror in my stash, which I edged with the same not sticky rhinestones that I used on the outside.  I added a few of the daisies for a pretty touch.  For the bottom, I took a piece of pink fabric and a piece of sparkly tulle and wrapped them around some quilt batting to make a pillow for a necklace for a sweet girl who loves anything sparkly!!

We would love to see your project, using a beautiful image from Ching-Chou’s Etsy store!! You can recycle anything….cardboard from a cereal box, string, ribbon from a top (the ones that are on the inside to help keep it on the hanger), or anything else that someone else may have thrown in the bin 🙂

I would like to enter the following challenges with this:

World Wide Open DT Challenge – #08 August ATG

A Perfect Time to Craft – #08 ATG for August

Morgan’s ArtWorld – August ATG #08

Through the Craft Room Door – ATG for the week of 8-14-18

Time Out Challenges – #116 Bright

Upcycled Paintbrush

Hi there 🙂  It’s Sunday, which means that it’s my day for inspiration at the Ching-Chou Kuik Facebook group!  Our theme for August is “Recycle” – it might sound hard at first, but it’s seriously easy….just reuse something….cardboard, tissue, jars, string, ribbon…..you get the hint 😉  I salvaged an old, used paintbrush for my wall hanging.  It was on the way to the bin, when I scooped it up, as I’d seen some paintbrush projects on Pinterest, and never had a brush.  I selected this image, available in the Circle Oriental Kimono Lady set.  After coloring the image with Copics, I set it aside while I went to work on the brush.  I randomly wrapped some cheesecloth and pearls around it, then added some yellow and blue seaweed-y type stuff.  I popped the image over this with some foam, then added a gold seahorse that I diecut with a Sizzix die 🙂  I had so much fun making this, I’m going to be on the lookout for more paintbrushes, so I can make more!!  Here’s some pics of different angles 🙂

I’d like to enter this in the following challenges:

Stamping Sensations – August – Use Your Favorite “current” stamp (I looooove Ching-Chou’s images, and these elegant kimono ladies are just so pretty)

Classic Design Team Open Challenge –  #8 August ATG

Morgan’s Artworld Open Challenge – #08 ATG

Southern Girls Challenge – Stamp Your Mark On It with Team Lou

Lemon Shortbread Challenge – #73 ATG

BBQ Buddy

Hi there!!! After a few technical difficulties, the brand new ATG challenge at Creative Fingers Challenges is finally starting 🙂  Technology is a wonderful thing, as long as it’s working!!  Our wonderful leader, Angelique, is sponsoring this time, with this fabulous stamp and die set!

What a wonderfully versatile set this is!!!  I chose to use an image from one of our regular sponsors, Bugaboo Stamps.  I colored the image (found here) with my Copics.  I cut a few strips of yellow with a stitched banner die, but cut the fishtail ends off when I layered them on the bright star background.  I stamped a sentiment, then matted all the elements with a red CS, before popping some bright star shaped buttons on to finish it off 🙂  A bright and cheerful card for a barbecue aficionado!!

I would like to enter this in the following:

Crafty Hazelnut’s Patterned Paper Challenge – August ATG with Patterned Paper

Catch the Bug Challenge – August ATG

Crafting With An Attitude – #42 ATG

Through the Craft Room Door – ATG week of 8-7-18

The Crafty Addicts – #51 ATG/ All About Boys/Men

Dahlia Pen Holder

Hi there!!! It’s been a hot week, ending in showers/storms all weekend!!! The good thing is, that as soon as it stops raining, the clouds break and the sun comes out to make it a beautiful day…..or part of day 🙂  My project for today is an inspiration piece for the Ching-Chou Kuik Facebook group challenge this month.  Our theme is “Recycle”, which can mean any number of things…..you can use recycled material in your project, or you can recycle the actual object (I’m sure there’s more ways of interpreting the theme, but my brain isn’t firing on all cylinders right now!).  I used the gorgeous Dream of Dahlia from the Etsy store to dress up this jar to make a pen holder.  I colored this beauty up with my Prismacolor Pencils, then fussy cut her out.  I took a piece of cardboard, that was a separator in a box, and ran it through my Cuttlebug with a pretty oval die.  It cut the basic shape out of the heavy cardboard (with a bit of help from me), and left a lovely embossed edge on the oval.  I glued the image to this and set it aside.  I took some twine (salvaged from an old job that I had….a TON of jeans came in, all individually rolled up and tied with twine….), and wrapped it around the middle of the jar.  I then took some pretty sheer ribbon and layered it over the twine before tying a pretty bow.  All I had to to then, was to center and glue down the image to finish this pretty recycle project 🙂


I’d like to enter this in the following:

Craft-Dee BowZ – August 2018 ATG with a Handmade Bow

Mod Squad Challenge Blog – Getting In Shape

Through the Craft Room Door – ATG for the week of July 31

Crafting With An Attitude – #42 ATG

Color Crazy Craft Challenge – Week 31 ATG

Hear Ye, Hear Ye!!!

Oh my!!! My head has been in the clouds with this funk I’ve been in, and I thought that I had blogged this card already!!!  The sweet little bunny here is from the Make It Crafty Store, and can be found here.  I colored Court Bunny up with my Copics, then cut him out and set him aside, while I prepared the background.  I took some parchment like paper and used Tim Holtz die and stencil in the harlequin pattern.  I inked the edges and did the stenciling with Distress inks.  To bring a bit more of the yellow in, I inlaid some off cuts of the harlequin die cut that I cut from a scrap of yellow paper.  I matted everything on a purple that was a scary close match (not on purpose!) to the bunny’s outfit 🙂  The sentiment is printed on the computer, and is cut out with a banner die.

I’d like to enter this in the following:

Make It Crafty – ATG June challenge

The Paper Shelter – Summer Break ATG

Simon Monday Challenge – Wild Things

Lemon Shortbread Challenge – #73 ATG

Through the Craft Room Door – ATG week of July 31

Mermaid Elegance

Hello there 🙂  It’s another Sunday, which means that it’s my turn to inspire at the Ching-Chou Kuik Facebook Group.  We have a challenge going for this month, and the theme is Summer/Seaside.  There are literally hundreds of gorgeous images at Ching-Chou’s Etsy store that can be used to create something in this theme!!!  I used the beautiful Midnight Tender, and colored her up with my Copics in my all time favorite color combo 🙂

After cutting the image out, partially with a stitched rectangle die, and partially fussy cut, I chose some pretty black and white printed paper pieces.  I matted the pieces with red, then tied some white twine around them before popping up the image on some foam dots.  I used both a Tim Holtz and a Recollections die for the sentiment, and added a pretty red blossom and some glitzy dots to finish it off 🙂

I’d like to enter this in the following:

World Wide Open DT Challenge – #07 ATG

Kitty Bee’s Aloha Friday Challenge – #123 ATG with optional Friendly Faces

Creative Moments – #148 ATG

Through the Craft Room Door – ATG week of July 17

Pixie’s Snippets Playground – #331 ATG with Snippets

Keep On Swimming

Good morning 🙂  Today marks my first day back at work after my little stay-cation.  It will be good to get back to the routine again, as I get a bit lost without it!!  It also marks the start of a brand new challenge at the Aurora Wings Challenge Blog 🙂

Image may contain: text

That’s right…..it’s ATG!!! Which means the sky is the limit for your creativity, and we would love, love, love to see what kind of amazing projects that you come up with!!!

I was having a bit of a time with the wide open theme, as my head goes in every which direction if given the opportunity (see above with my reference to routine, lol).  Well, Donna, the DT lead at Aurora Wings, gave me the idea of a clean and simple card….which I took a step further (of course) and decided on a one layer CAS card.  I’ve done CAS before, but never a one layer.  I decided on the Two Goldfish image (found exclusively at the AuroraWings.com store), that I added a sentiment to before printing it off on some pretty turquoise CS.  Because I was making a one layer card, I colored the image with my Prismacolor pencils, to prevent any bleed-through.

On my FOURTH try, I stopped there…..clean and simple, nothing else needed…..Mitzi’s gorgeous artwork properly showcased…..enough.  But on my first THREE times, I did not stop, I kept trying to add something….texture with an embossing folder (oops….wrecked the colored image…in the bin), some stenciling (too fussy for the overall look…..in the bin), some stamping…..NO….just awful, and in the…bin.  Sigh.  After finally showing some restraint….really had no choice as I was running out of the right size of blue paper….I called it done.  I can honestly say that I have enormous respect and admiration for the cardmakers out there that make the beautiful one layer CAS cards….they are truly amazing!!! As for me, I’m afraid this is a one of…..I’m happy I did it, love the result, but will never put myself through this again!!!!

I’d like to enter this in the following:

Lil Patch of Crafty Friends – #86 ATG

Crafty Creations – #370 ATG

Creatalicious Challenge – #143 ATG with optional No Patterned Papers

Creative Shopping Challenge – #65 Underwater World

Dreaming of Scrap – #57 Air or Sea