OOPS!! Apparently I don’t know my dates, and how to schedule stuff….this card, my inspiration for the current ATG challenge at Creative Fingers, is a day late :O We are being sponsored this time by the one and only Bugaboo Stamps 🙂 I printed the cute little dude – Kidz Sitter – Music – a bit, ok, a lot, bigger than I had intended, so had to rethink my entire project. I am entirely too cheap to just reprint an image, lol! Also, I’m running low on ink, and with the temperatures sitting at -35 and below this week, I was in no hurry to venture anywhere to get anything!! Anyhow, I colored this up with my Copics, then fussy cut the legs out before matting the image in a bright green CS. I found a scrap of blue camouflage paper, and some music print papers to complete the layers. I die cut a number of music shapes , and an “awesome” sentiment and completed the sentiment with some spare stickers that I had. I got this finished just in time to pop in the mail to a truly awesome birthday boy, who, of course, loves his music 🙂
I didn’t think I’d ever get to the point where I was actually writing this post!!!! Last year, I got the brainwave to make my own calendar, and I created an Aurora Wings Sprite calendar…..I loved flipping the pages each month to see another adorable Sprite! So…….I decided to once again create my own calendar, using some of the exquisite mermaids by Mitzi of Aurora Wings. Apparently I forgot the work involved, because there was NO WAY this sucker was going to be finished in a week (I started just after Christmas), and I was in a bit of a panic about what to do. A good friend suggested I make it from February 2019 to January 2020, and that way I give myself a bit of leeway for next year if I forget to start early again! I finished on February 2, just in time for the midway reminder post for our first challenge of the year at Aurora Wings Challenge Blog. We started off with everyone’s favorite theme – ATG, and would love to see what your creativity produces!!!
Making a calendar has it’s own set of challenges….the biggest for me being to keep the weight down so it doesn’t tear off the wall when I hang it. This means that I have to use lightweight DP for the background, and minimal embellishments (which have to be flat!). Thank God I have a hoard of paper that I managed to find coordinating papers in the appropriate weight!! The embellishments are comprised of die cuts, Cricut cuts, Stickles, Liquid Pearls, and some hand cut shapes when needed. All images are colored completely with Copics, with accents of white gel pen – with the exception of January’s background, which is done with chalk. I downloaded a blank calendar grid, so I could use my choice of font.
Finally hanging on the wall!!!
I filled in holidays, seasonal changes and when the full moon lands each month (so when people say, “it must be a full moon” – I can either confirm or correct, lol). I had a bit of fun with the full moon icon, using a wolf howling at the moon 🙂 I bound the calendar with a spiral from a notebook that I purchased and dismantled, then hand wound it through the holes I made with a handy dandy American Crafts punch that I have 🙂
And here are the details by month 🙂 * Warning!!! * It’s a year long post!!!!
january
Siren – Found HERE in the Digi Shop, and HERE on Etsy
february
Whisper of the Sea – Full version found in Gardens and Goddesses 3 coloring book, watch for it to become available HERE on Etsy, Face only image found HERE at the Digi shop.
March
Journey Home – Available exclusively in the Digi Shop HERE
april
Mermaid on Crescent Moon – Found HERE in the Digi Shop, HERE on Etsy, and the full version (what I used) is found HERE in the Gardens and Goddesses 1 coloring book, and HERE in this PDF coloring page set
may
Fins and Pearls – Found HERE in the Digi Shop, HERE on Etsy, and in THIS set of PDF coloring pages.
june
The Ruby Slipper – Available HERE in the Digi Shop, HERE on Etsy, and the full version (what I used) is found in THIS set of PDF coloring pages, and in the Gardens and Goddesses 1 coloring book HERE
july
Starfish Mermaid – Head only version found HERE in the Digi Shop, and HERE on Etsy. Full version (what I used) is found in THIS set of PDF coloring pages, and in the Gardens and Goddesses 3 coloring book, watch for it to become available HERE
august
Mermaid’s Wish – Found HERE in the Digi Shop, and HERE on Etsy
september
Autumn Mermaid – Found HERE in the Digi Shop, and HERE on Etsy
october
A Dark Undercurrent – Full version available HERE in the Digi Shop, and HERE on Etsy. It can also be found in the Midnight Gardens coloring book – watch for it to become available HERE.
november
Lady of the Sea (Full Version) – Available HERE in the Digi Shop, in THIS set of PDF coloring pages, and in the Gardens and Goddesses 3 coloring book; watch for it to become available HERE
december
Christmas Mermaid – Found HERE in the Digi Shop, and HERE on Etsy
Wow!!! Looking at the time, I see that another 3 hours have passed!!! After the last month+, I’m not sure I’m going to know what to do with myself!!! I can bet that mermaids will NOT be involved in whatever I do, LOL. Here’s to a new year!
I would like to enter this in the following challenges:
Crafter’s Cafe Challenge – #212 Fairytale (mermaids!) or I spy with my little Eye something beginning with F (February, Friday, Fish, Flowers…..a bunch of stuff 😉 )
Good morning! It’s hard to believe that January is quickly coming to a close! This is my last inspiration project for the Ching-Chou Kuik Facebook challenge this month, with the theme of “New Beginnings”. The blog has the same theme, so if your project qualifies for one, it qualifies for both (Facebook challenge requires that you use an image by Ching-Chou Kuik) – double the chance to win some of these gorgeous images. But HURRY, time is almost out!!
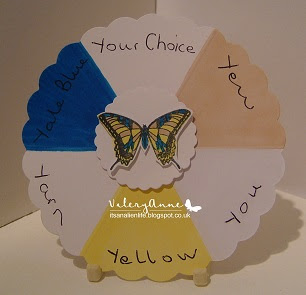
I used the Butterfly from thisset for my New Home card.
Since the DT was challenged to use 2 different ribbons on their project this week, I colored the image with my Copics to match the butterflies on some ribbon that I have had for forever (2 spools yet, LOL). I was super happy that I managed to match the colors up as well as I did.
My other ribbon choice was just a simple ivory satin. The blue background paper looked a bit “blah”, so I rummaged around in my stamps and found the squiggles that emulate the postal mark on the ribbon and stamped and embossed them with clear powder and ink. The die cut and stamped/embossed sentiment are from Sugar Pea Designs (a prize I was lucky enough to win in a challenge in the past year). An orange mat before attaching this to a card blank finished the card off 🙂
I’d like to enter this in the following challenges:
The Butterfly Challenge – #115 Spin the Butterfly Wheel with the Letter “Y” I used Yale Blue and Your Choice, which was Heat Embossing, and, of course a butterfly 😉
Hi there 🙂 Today marks the beginning of the very first challenge of 2019 at Creative Fingers Challenge Blog 🙂 The DT is excited to start this year, which is sure to be full of amazing projects from all of our entrants, inspiration from the DT, and welcoming back some old sponsors, and introducing new ones!! Our first sponsor for the year is the wonderful Morgan’s Artworld – there is such a wide variety of images in the shop, that you’re sure to find something you love!!! The DT was lucky enough to be provided images to work with, and I chose Country Child No. 5. I colored her up with my Copics, doing all the shading (with the exception of the skin) on her with my warm greys – I feel that it gives the image a bit of a rustic look.
I cut it out with a pretty oval die, then started messing around picking out papers 🙂 I found pretty polkadot and stripe prints, and distressed and inked the edges. My base color was Kraft card stock. I die cut one of the pieces with a Tim Holtz corner die from Sizzix, and used the other as a mat. The bright yellow sentiment was toned down with the same Distress Ink (pumice stone) that I had run around the edges of all the pieces. I added some lace, yellow ribbon, a pink rose (to reflect the roses in the image), a few daisies and sprays, some die cut leaves and a few adhesive pearls embellish this card. It’s a bit fussier than my usual cards, but everything seemed to “fit” and I was quite happy with the results.
I hope you can join us at Creative Fingers for our ATG challenge, and inspire US with YOUR creations!!!
As You Like It – Pearls or Buttons? Pearls! Why? I love the sheen of pearls, and with their variety of sizes they can be stuck anywhere….I rarely make a card without a pearl SOMEWHERE on it!!
It’s a busy blogging day for me 🙂 Usually, it’s one post, but, today it’s 2, as this also marks my day for week 2 of the Ching-Chou Kuik Facebook Challenge. Our theme this month is “New Beginnings” – eg New Year, NEW BABY, NEW HOME, NEW JOB OR EVEN NEW CRAFTY STASH. The theme on the blog challenge is the same, so be sure to enter in both challenges to double your chance at winning!! January is also the month that Ching-Chou’s birthday falls in, so we have an extra special bonus challenge in the Facebook group, so be sure to stop by and wish Ching-Chou a happy Birthday!! For this card, I used a beautiful image from this pack in the CCK Etsy store. I colored her up with Copics and then cut the image out with a stitched rectangle die.
I managed to find some background paper that coordinated beautifully with both the colors and the “feel” of the image. I distressed the edges and inked them in black to add a bit more texture and interest. I wanted to bring some of the gold into my card, and as I scrounged through my stuff, I found a sticker sheet that was perfect!! I used a rectangle sticker on some purple backing paper, then attached it to the base over 2 strips of black ribbon.
This week, the DT was challenged to use pearls or gems on their projects. I had been keeping an eye on these packages of flat back pearls and gems in Michael’s for some time, and they finally went on sale!! I couldn’t stop at just on pack, so got a gold/silver and a black/iridescent pack 🙂 I used some from each pack on this card (new stash AND pearls/gems – woohoo!!!) I finished it with a peel off sentiment sticker that I’d gone over with my black Copic. I was thrilled to be able to combine both the challenge theme and the additional DT challenge with this card 🙂 Talk about fun trying to get a photo, with all that sparkle and shine reflection, though!!!
I’d like to enter this in the following challenges:
Hi there!! Am I the only one that has no idea where the first 2/3 of January went??? We finally have winter temperatures here in Saskatchewan……but only for about a week. All in all we’ve been quite spoiled with the relatively (for here) mild temperatures and lack of snow this year!! Anyway, time for a brand new challenge at the Sheepski Designs Facebook page. All of our challenges are ATG, but there is also an optional theme to help with choosing what image to use, if you wish. Our Jan/Feb theme is “That Little Thing Called Love”. I browsed around in the Sheepski Etsy shop for some kind, trying to decide on a “lovey” image, and I finally chose Floral Heart. This image comes with the heart merged with a butterfly, as well as with the heart and butterfly separate. I chose to just use the heart for this wedding card I made. I colored it up with my Copics, then used a Penny Black stamp to add the sentiment before fussy cutting it out. I’m trying to use some colors that I normally avoid, and this particular green is one of them. Goes nice with the image though……. I embossed the edge of the green with a little embossing folder that I got as a complimentary gift with a magazine a number of years ago. I added the strip of sheer black ribbon, and matted it with black, before doing up the bow. I added the bow after assembling everything else, because I had a back-up plan…..which is usually a good idea with me and bows…..but it worked perfectly!!!! Maybe a trend for 2019???? I finished the card off by adding some liquid pearl accents. Here’s a closeup of the embossing and bow 🙂
Hi there!!! I hope that 2019 has been treating you well so far! 🙂 This is my first inspiration post for the current challenge at the Ching-Chou Kuik Facebook group. Our first theme of the year is “New Beginnings” – this can be New Year, New Baby, New Home…..etc. or even new crafty stash 🙂 The theme on the challenge blog is the same, so you can double your chances to win! I went with a New Year card for my project. I used the New Year Celebration image from Ching-Chou’s Etsy store. I colored her up with my Copics, using a white gel pen for a few accents, then matted her in black and green.
I used my least favorite color on this card…..peach!! I embossed the background paper with a folder that reminded me of fireworks, then matted it in the same colors as the image. I die cut the sentiment and butterfly out, but no matter where I tried to place the numbers for the year, it looked dumb, so I left them off. I balanced things off with some green gems.
Hi there, and Happy New Year!!! I haven’t been close to my computer, with the exception of checking Facebook once in a while, for weeks!! Time to get back at it!!! This card is one that I made for Ching-Chou Kuik’s birthday. We have a special birthday event going on at the Facebook group, with a chance to win some of this very special lady’s gorgeous images. This card features the image Simply Roses.
I colored it with my Copics, then cut it out and glued it to a teal piece of card stock that I’d die cut with the sentiment. I placed everything on a pretty rose print DP, and added some white gel pen accents, and inlaid the bottom part of the sentiment with white die cuts. Since I wanted this card flat for mailing, the only embellishment that I used were some coordinating sequins.
Hi there!!! Christmas is almost upon us, and the celebrations have been in full swing, for some people, for some time now! Me?? I’m still trying to catch up!!! It doesn’t help that the original card I’d made for this post, I sold, believing that I had taken photos…..NOT!!! Oh well, just a good excuse to play with the lovely Ching-Chou Kuik images 🙂 This is my last inspiration post for our December Facebook challenge….with the theme being Celebration. I used the adorable Toadstool Head image. I colored her up with my Copics, adding some gel pen accents on the toadstool spots.
I fussy cut her out, then popped her on to a stitched die cut shape. I cut some holly leaves with a Sizzix die, and after scattering them around the image, added some gem stone “berries”. The red velvet ribbon makes a nice contrast to the black and white Christmas word background paper, and ties in to the red card base. I’m hoping that this is the last Christmas card I have to pop out…..but with my memory, I wouldn’t count on it….I’ll probably be coloring, cutting and gluing while preparing the turkey on the 25th!!! But just in case…..I’d like to take this opportunity to wish anybody reading this a very Merry Christmas, full of love and laughter!!!
EEEK!!! I’m running so far behind here, that I almost missed my inspiration post for the current Ching-Chou Kuik Facebook challenge, with the theme Celebrations. I was needing a break from the Christmas theme, so made this card, featuring the gorgeous image Gift, which is part of the Flora and Fauna set, found at the CCK Etsy store. I colored her up with my Copics, then framed her with a lovely die cut in grey. I lucked out and found the bird and flora print paper for the background, that was even in the right colors!!! I never pick my paper before coloring, so am often frustrated when I find the right print in the wrong colors….but do I learn?? LOL I also found a bird chipboard embellishment to used, which I colored to match the dark grey die cut sentiment and matting. I finished off with some daisies and some glitter berries, which also tied in with the image.
Although this was a refreshing change from Christmas, I really need to get more holiday stuff done…..I sold most of my cards (NOT complaining!!), and the day is drawing closer!!!