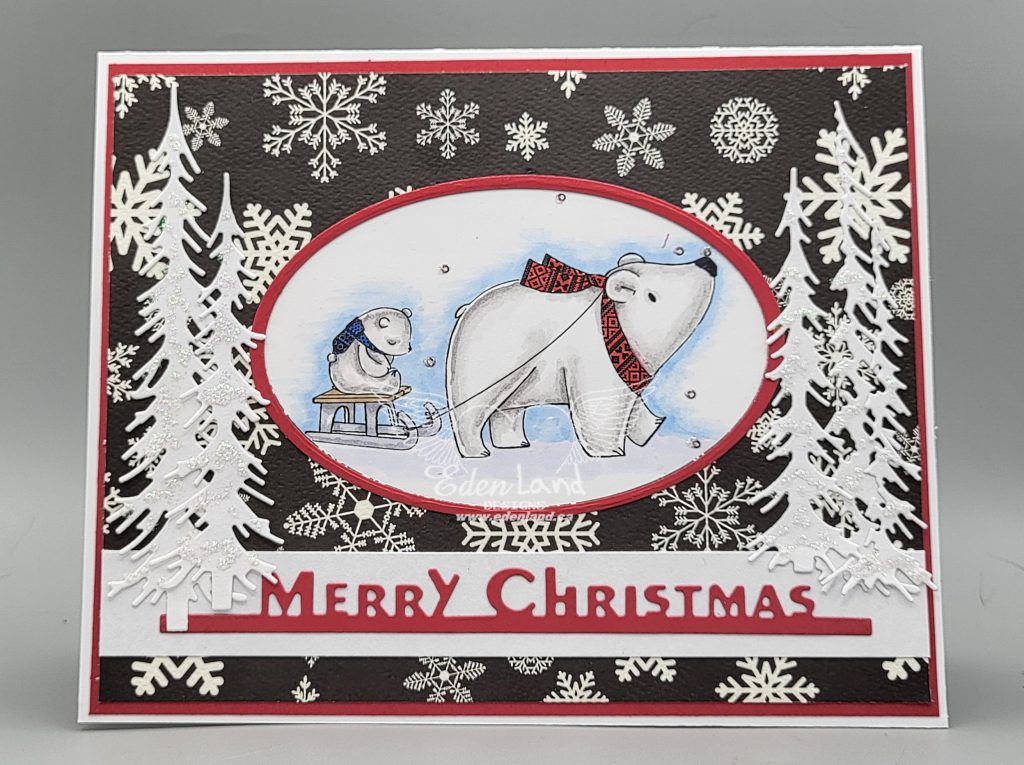
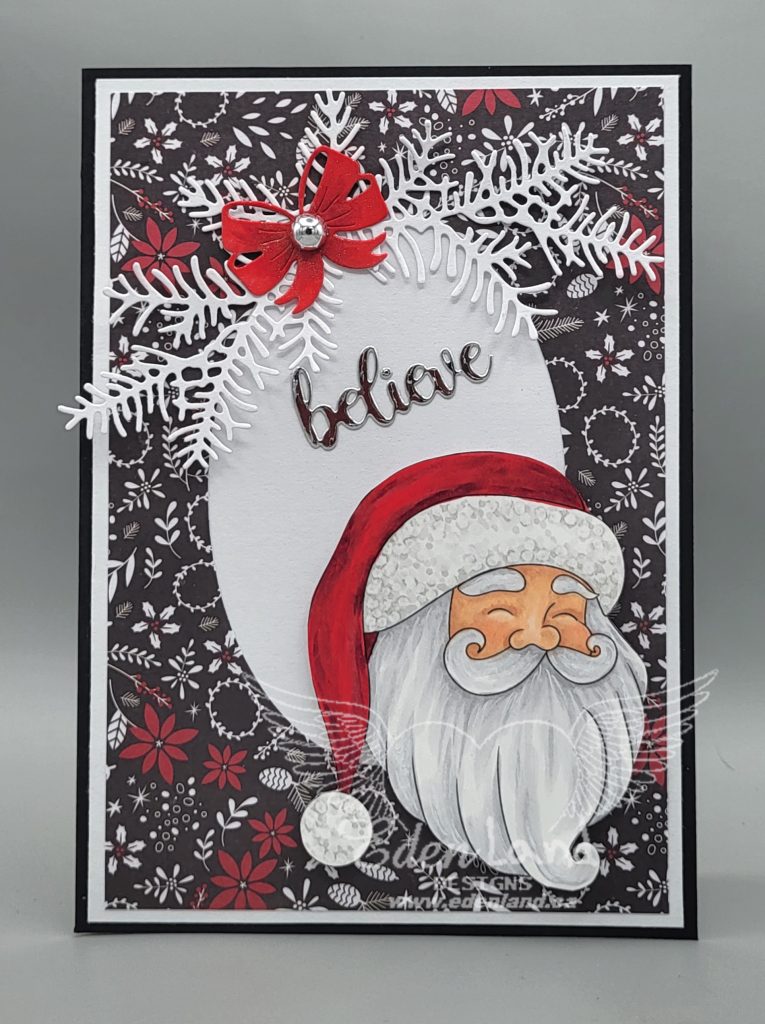
Sledding Bears

Hi there 🙂 I’m back with another card for my GDT time over at the C.R.A.F.T. Challenge 🙂 This week, the theme of the Challenge is Christmas/First Christmas. Our sponsor is the fabulous All Dressed Up Stamps, and they are offering the lucky winner 2 images of choice. I was given the image Sleepy Bear to play with. I colored it up with my Copics, then cut it out with an oval die. I found a perfect size piece of black and white snowflake printed paper, and decided that this card would be in my favorite color combo of black, white and red! I matted both the image piece and the base, then die cut a red sentiment, that a placed over a strip of white. I arranges some tall die cut trees on either side of the image, then added a bit of sparkle with Stickles….because every Christmas card needs a bit of sparkle on it!!

Once again, I’d like to thank the ladies at C.R.A.F.T. for inviting me to be a GDT this month, and really hope you can join us in this Christmas challenge <3

I’d like to enter this in the following:

All Dressed Up Blog Challenge – #152 June ATG with an All Dressed Up image

Lil Patch of Crafty Friends – #232 ATG

Pammie’s Inky Pinkies – #2424 ATG

Penny’s Papercrafty Challenge – #574 ATG

Creative Inspiration – #15 ATG

A Star’s Birthday

Hi there 🙂 It was recently my son’s birthday, and I wanted to make him a special card. I’ve tried this Mini Miura card fold before and love it! I alter the pattern a bit, extending the back and middle portion, so it stands for display better. After getting the card base cut and folded, It was time to decide on the DPs to use. My son is truly a star, so when I dug up this holographic star print paper in my stash, it was the perfect choice! I cut, matted and glued down all the pieces (so much measuring and math stuff). I dug through my dies, and found a shooting star die, of course out of it’s package, but I think it’s from Simon Says Stamp. I cut a number of pieces, white for the blue panels, and blue for the white panel in the centre. I punched a few silver stars to scatter around as well. A black and white birthday sentiment finished the card for my star off!

Here’s a few different angles of the card:

I’d like to enter this in the following:

The Paper Funday Challenge –  #66 – Anything Goes with Optional Twist: Fancy Folds

Allsorts Challenge – Week 785 Masculine

Creative Moments – #259 Men and Boys

Crafty Gals Corner – #256 ~ Anything Goes w/twist – Fancy Fold

613 Avenue Create – ANYTHING GOES w/ OPTIONAL TWIST: FOR THE GUYS

Classic Design Challenge – #06 ATG with Optional Twist: Fancy Folds

May the Course Be With You

Hi there 🙂 I was honored to be chosen as Star of the Month recently at C.R.A.F.T. Challenge, and am thrilled to be joining them as a GDT for this month. This week’s sponsor is Polkadoodles, who are offering 3 digital images as the prize. The challenge theme is Transport/Sports, so I went the sporty route with this cute Golf Gnome from our sponsor. I colored him up with my Copics, then matted the image in a dark green.

I recently found a cool pad of papers at the Dollar Store and the colors went well with the ones I used on the image. I cut some pieces out and matted them with the same green as I used with the image, then assembled the card. I’m not sure what this particular type of card is called, with the image bridging the 2 front pieces, but it’s one I enjoy making from time to time.

I found the cute sentiment and printed it off and added it to the inside where it still is visible when the card is closed. I hope you can join us at C.R.A.F.T. Challenge for our Transport/Sport challenge!!

I’d like to enter this in the following:

Creative Moments – #259 Men and Boys

Polkadoodles Craft Challenge – Week 23 ATG

613 Avenue Create – ANYTHING GOES w/ OPTIONAL TWIST: FOR THE GUYS

As You Like It Challenge – With or Without Words – With! why? my cards feel naked without some kind of sentiment, and words just finish it off the right way!

Cupcake Challenge – #596 For the Guys

Corbin and Holly

Hi there 🙂 I love making cards that are customized for the recipient, so of course I had to come up with a special one for my son and his girlfriend!! My son has the most spoiled kitty EVER (yes, granny Susan contributes her fair share), and Corbin is really the apple of his eye <3 His girlfriend is a horse girl, and loves spending time with her beloved horse, Holly. I looked all over for the right image, and then came up with the idea to combine some favorites. I merged Horsey Holidays and Purrfect Gift together, both from Whimsy Stamps. I colored them up with my Copics, referring to pictures to make sure the markings were as close as possible to Corbin and Holly. I added a few touches with my Posca, before setting it aside to figure out the rest of the card.

I die cut a snowflake swirl, and a few spare snowflakes to pop on the swirl with foam dots for a bit of dimension. I added some gems in the centre with red glitter glue to give a touch of sparkle. The big Christmas die cut fit the width of the card perfectly, and a stamped “Merry” on a die cut banner completed the sentiment. I assembled everything on the plaid background, then just had to add a tiny snowflake on Holly’s nose to finish things off 🙂

I’d like to enter this in the following:

Christmas Kickstart Challenge – #87 It’s A Gift

Creative Inspirations – Christmas In June

Passion for Markers – Week 743 Animals

Pammie’s Inky Pinkies – #2423 ATG

Lil Patch of Crafty Friends – #231 ATG

Special Delivery

Hi there 🙂 I was honored to be chosen as Star of the Month recently at C.R.A.F.T. Challenge, and am thrilled to be joining them as a GDT for this month <3 This week’s challenge theme is “Male”, and the wonderful sponsor is Colour of Love, offering 3 images to the lucky winner. I’m using the image Cliff the Stork, for a sweet baby boy card. I colored him up with my Copics, then fussy cut him out.

I had chosen my papers beforehand, so I could coordinate the colors with the image, but had no idea as to what I was going to do for the layout!! After shifting pieces a number of times, I made up my mind, and got to work. I layered the pieces together, sewing one piece on with a zig zag stitch for a bit more interest. After attaching the die cut fishtail banner piece, I cut out the sentiment twice, to layer the letters for a shadow effect, and attached them to the card. I popped on Cliff with some foam dots for a bit of dimension. There was still something missing, so I cut out a few arrow head pieces and added some dots to them – this finished the card off perfectly 🙂 I do hope you can join us at C.R.A.F.T. Challenge with your male makes this week, as we’d love to see where your creativity takes you!!

I’d like to enter this in the following:

Simon Monday Challenge – Masculine

613 Avenue Create – JUNE 2024 – ANYTHING GOES w/ OPTIONAL TWIST: FOR THE GUYS

Classic Design Challenge – #05 Anything Goes with Optional Twist: Masculine

Simon Wednesday Challenge – Masculine

Allsorts Challenge – Week 783 Lots of Layers

Floral Wishes

Hi there 🙂 It’s been quite a while since I’ve posted anything. Life has been really been kicking my butt lately, and I don’t seem to have time for anything!! However….I was honored to be asked to guest design for Coloring With Pencils, and it gave me the push to get back to what I love 🙂 I was given this lovely image from one of The Paper Shelter‘s fabulous coloring books, Fairytale Ladies. I colored this beauty up with my Prismacolor pencils, then distressed and inked the edges.

I found some scraps of white and a light grey cardstock, and got to work on them. I die cut one of the white pieces with a pretty edged die, then embossed a piece of the grey with a fun floral embossing folder that I’d brushed lightly with some ink. I distressed and inked the edges of the other pieces, then started layering everything. I added a pretty piece of lace, then took a piece of crinkle ribbon from DL Art, and wrapped it around a few times before tying a bow. After I had everything stacked the way I wanted, I added a few pearls, and some die cut butterflies as finishing touches.

I hope you can dig your pencils out, and join us at Coloring With Pencils!! There are 4 fabulous sponsors this month: Color of Love, Polkadoodles, Last Minute Manda, and The Paper Shelter – so you have a great chance of scoring some goodies 🙂

Gingerbread Fun

Hi there 🙂 I’ve always loved gingerbread houses and men, so it was so much fun having a play with this image from All Dressed Up. I can’t find it on the Etsy site right now, but it might reappear at some point!! I colored it up with my Copics, then fussy cut it out. Glitter and shine were added to some of the candies and trims for some extra fun.

I used a Whimsy Stamps slimline die to cut out the background, and embossed the centre piece with a dotted folder to look a little bit like snow (and I didn’t realize that I put this piece in upside down until the card was finished!! inverted snow? lol) After assembling the card front, I remembered I had some gumdrop brads in my stash, that would make a nice addition to the card. I got them on just before adding to the card blank!! A pretty die cut sentiment finishes the card off.

I’d like to enter this in the following:

Christmas Craft Creations – Stencils or Embossing Folders

All Dressed Up Challenge – #148 ATG with an All Dressed Up image

Creative Knockouts – #515-Die Cuts/Punches/Stencils

Rabisco Challenge – #54 ATG

Polkadoodles Crafting Challenge – Week 8 ATG

A Kitty Tree

Hi there 🙂 I have a good friend that absolutely loves cats, and also has a real “thing” for anything blingy or sparkly. I decided to combine the 2 with this adorable image from Conie Fong. I colored up Purr-fect Christmas with my Copics, then fussy cut it out. I had fun coloring all the kitties differently 🙂

I took the shiny striped background paper, and cut an aperture in it, then took a piece of red card stock, and cut a smaller one in that. I backed everything with a sparkly silver paper, to give the card a double matted effect. For some bling, I placed rhinestone gems around the window, to give a bit of a marquee effect. A few more were added in the corners, because you just can’t get enough bling!! After placing the image, I die cut the sentiment a few times, and layered it to give it a bit of dimension.

I’d like to enter this in the following:

ABC Christmas Challenge – C is for Cats, D is for Dogs

Christmas Kickstart – #83 Out on a Limb (like it or not, when you have cat’s it’s a never ending battle!)

Let’s Craft and Create – #204 – AG + Polka Dots and/or Stripes

C.R.A.F.T. Challenge – #709 Christmas

Dream Valley Challenges – #310 Our 4 Legged Friends

Seahorse Gatefold

Hi there 🙂 I had an idea with these seahorses with an image I’d printed out, but it didn’t work out at all, so rather than take the 2 steps to put the dies away, I came up with this 🙂 These 2 dies screamed gatefold card, so I listened! lol After assembling the card so the 2 seahorses lined up facing each other, I went to work on the inside.

I dug into my dies again, and cut some pretty seashells and seaweed to keep with the underwater theme, then added a birthday sentiment. A belly band with some black and white ribbon holds everything closed for sending. Love the dramatic black and white of this whole card!

I’d like to enter this in the following:

The Paper Funday Challenge – Challenge #62 – Anything Goes with Optional Twist: No Patterned Paper

Crafty Catz – #666 ATG with optional More than One Fold

Time Out Challenges – Challenge #257 – Time Out 10th Birthday!

Creative Knockouts – #515-Die Cuts/Punches/Stencils

A Place to Start – FEBRUARY 2024 – Monochrome

Baby Deer

Hi there 🙂 When I saw this deer on the Kit and Clowder Advent event, I fell in love instantly!! Even though the advent is over, Alyce has a lot more goodies available on her website, and Facebook group. I printed this sweetie off on grey paper (the wrong side!), and colored it up with my Prismacolor pencils. Some highlights and accents were added with a Posca pen.

With such a cute image, I wanted to keep the card on the simple side. I die cut the poinsettia border, and glued it to the front, which I’d cut down so the die cut was equal to the back side. I added a red panel to the inside of the back, so the die cut popped. The same red was used for matting and the die cut sentiment. Some small gold gems were added to the centre of the poinsettia in both the die cut and the image, just to add a tiny bit of festive bling 🙂

I’d like to enter this in the following:

C.R.A.F.T. Challenge – #709 Christmas

Coloring With Pencils – February ATG with Pencils

Gem of a Challenge – Week 4 ATG

Pammie’s Inky Pinkies – #2407 ATG

Crafts Galore Encore – February ATG